TABLE OF CONTENTS
- Access AI Agent Studio
- Create a new AI Agent
- Overview of AI Agent
- Build the capabilities of the AI Agent
- Test the AI Agent
- Preview the AI Agent
- Deploy the AI Agent
- Analyze AI Agent performance
- Leverage AI Agent Studio library
- Archive and restore AI Agents
AI Agent Studio enables you to create, deploy, and continuously improve AI agents that handle customer interactions across channels. These agents are designed to automate Level 1 support and how-to queries using your knowledge sources, workflows, and instructions.
This article walks you through the complete lifecycle—from creating an agent to deploying and optimizing it over time.
If you are looking for channel-specific setup, see:
- Email AI Agent setup and configuration
- Chat AI Agent setup and channels
Access AI Agent Studio
- As an admin, navigate to AI Agent Studio on the left navigation bar.
- In the AI Agent Studio overlay, choose AI agents to view a list of pre-built agents tailored for specific business cases, allowing you to explore and test them before creating your own from scratch.

This is your central workspace to create, monitor, and manage all AI Agents. It also shows session usage and agent status at a glance.
Create a new AI Agent
- In AI Agent Studio, click Create AI Agent
- Provide:
- Name
- Avatar
- Primary language
- Click Create AI Agent

These settings define how the agent appears to users and the primary language it operates in.
Overview of AI Agent
The Overview tab adapts to where you are in your AI agent setup. When you first configure the agent, it walks you through the key steps — connecting your knowledge base, setting the agent's tone, and defining escalation behavior. Once the agent starts handling conversations, the tab transitions into a live performance dashboard showing metrics like deflection rate, conversation volume, topic distribution, and customer feedback scores.

Use this view as your primary monitoring layer to assess adoption, validate automation outcomes, and identify areas that require optimization.
Note: The Overview tab relies on interaction data. For newly created agents or low-traffic environments, insights may be limited until sufficient conversation volume is reached.
Interpret core performance metrics
The top section highlights key indicators that reflect how effectively your AI agent is handling conversations.
Total conversations
Represents the total number of interactions handled by the AI agent within the selected time range. This metric establishes the footprint of AI in your support operations. It defines how much of your customer interaction volume is being handled by the agent.
Look for,
- Steady growth in conversation volume
- Alignment with overall support demand
Based on the metrics,
- Use as a baseline to measure AI adoption over time
- Compare against total ticket volume to evaluate coverage
- Low volume may indicate limited channel exposure or discoverability
Deflection rate
Indicates the percentage of conversations resolved without escalation to a human agent. Deflection rate is your primary efficiency metric. It directly reflects how effectively the AI agent reduces support workload and operational costs.
Look for,
- High and stable deflection rates
- Improvement over time as the agent matures
Interpreting this metric:
- High deflection → expand AI usage to additional scenarios
- Low deflection → investigate knowledge gaps, unclear instructions, or missing workflows
- Sudden drops → review recent changes to content or configuration
Positive feedback
Captures the number of interactions where users rated the AI agent’s response as helpful. This metric validates response quality and customer satisfaction. It confirms that the agent is not only resolving queries but doing so effectively.
Look for,
- High volume of positive feedback relative to total conversations
- Consistency across time periods
Based on the metrics,
- Identify high-performing topics and replicate those patterns
- Use as supporting evidence when reporting AI success to stakeholders
Negative feedback
Tracks the number of interactions where responses were rated as unhelpful. Negative feedback highlights failure points in the AI experience, including incorrect answers, unclear responses, or missing information.
Look for,
- Concentration of negative feedback around specific topics
- Increasing trend over time
Based on the metrics,
- Prioritize investigation of high-frequency failure areas
- Review conversation logs to identify root causes
- Refine knowledge sources and instructions accordingly
Analyze conversation distribution by topic
The Topic distribution chart breaks down conversations into categories such as refunds, cancellations, and delivery issues, along with their relative contribution. This view reveals where your AI agent is delivering the most value and where optimization efforts will have the highest impact.
Look for,
- High-volume topics dominating the distribution
- Long-tail categories with low coverage
Based on the metrics,
- Prioritize improvements for top conversation categories
- Introduce workflows for repetitive, high-volume use cases
- Monitor shifts in distribution to identify emerging customer issues
Prioritize improvements using recommended fixes
The Recommended fixes panel surfaces actionable suggestions based on conversation data and user behavior. This panel acts as a built-in optimization engine, translating raw interaction data into prioritized actions.
Each recommendation is tied to a specific pattern, such as:
- Frequently misunderstood queries
- Missing or incomplete knowledge
- Repeated fallback responses
Look for,
- Recommendations backed by high conversation counts
- Recurring themes across multiple suggestions
Based on the metrics,
- Address high-impact recommendations first
- Update existing content for clarity and completeness
- Add new knowledge for uncovered scenarios
- Treat this as a continuous feedback loop for improvement
Validate overall performance signals
The performance summary provides a directional assessment of how the AI agent is performing. This acts as a quick health indicator, helping you determine whether a deeper investigation is required.
Look for,
- Consistent positive performance signals
- Alignment with metric trends above
Based on the metric,
- Use as an entry point before exploring detailed analytics
- Escalate to deeper analysis if performance signals contradict metric trends
Leverage guided optimization resources
The Overview tab also highlights guided resources such as workflow enablement and training support. These resources help transition from basic automation to advanced, outcome-driven AI usage.
Look for,
- Opportunities to extend automation capabilities
- Gaps in current configuration
Based on the metric,
- Use workflows to automate complex or multi-step scenarios
- Leverage training resources to improve configuration quality
- Engage expert guidance for scaling AI adoption
Build the capabilities of the AI Agent
Once created, configure what the agent knows, how it behaves, and what actions it can take.
1. Add knowledge:
In the Knowledge section, use the Build tab to add the knowledge sources from which you want the bot to learn. Learn more about enabling Knowledge.
Knowledge upload guide:
Files | Type |
|
AI agent level limits |
| |
Account level limits |
| |
URLs | Type |
|
AI agent level limits |
| |
Account level limits |
|
2. Build Workflows
Workflows extend your AI Agent’s ability to think, reason, and act—automating complex workflows like order cancellations or subscription updates. You can create and manage Workflows using:
- Workflow builder - giving you complete control to build workflows from scratch
- Workflow library - enabling you to integrate pre-existing templates easily
Learn more about Workflows for AI agents.
3. Provide Instructions
You can set clear directions for your AI agent to understand your business and deliver seamless, context-aware interactions. This page has two sections,
- Define your business context: Describe your products, services, and typical customer scenarios. This ensures AI responses are accurate and tailored to your operations.
- Set custom instructions: Provide high-level rules shaping how the AI thinks, acts, and responds in every interaction. Include precise guidelines and key terminology to guide responses.
Learn more about defining Instructions.
4. Set up Configurations
You can fine-tune your agent’s conversation behavior and escalation flow using these advanced configurations.
- Multilingual support: Manage the languages in which the AI agent will respond from the list of supported languages.
- Conversation behaviour: Specify how the agent interacts, including the introductory message, tone, response length, fallback handling, feedback, and user details collection.
- Handover settings: Set options for closing conversations, transferring to a human agent, auto-resolution timing, and transferring outside of business hours.
- Agent Identity: Customize your agent's name and avatar that your users will see.
Learn more about Configurations. Detailed configuration for interaction behavior, channel routing, and response handling is covered in:
Email AI Agent setup and configuration
Chat AI Agent setup and channels
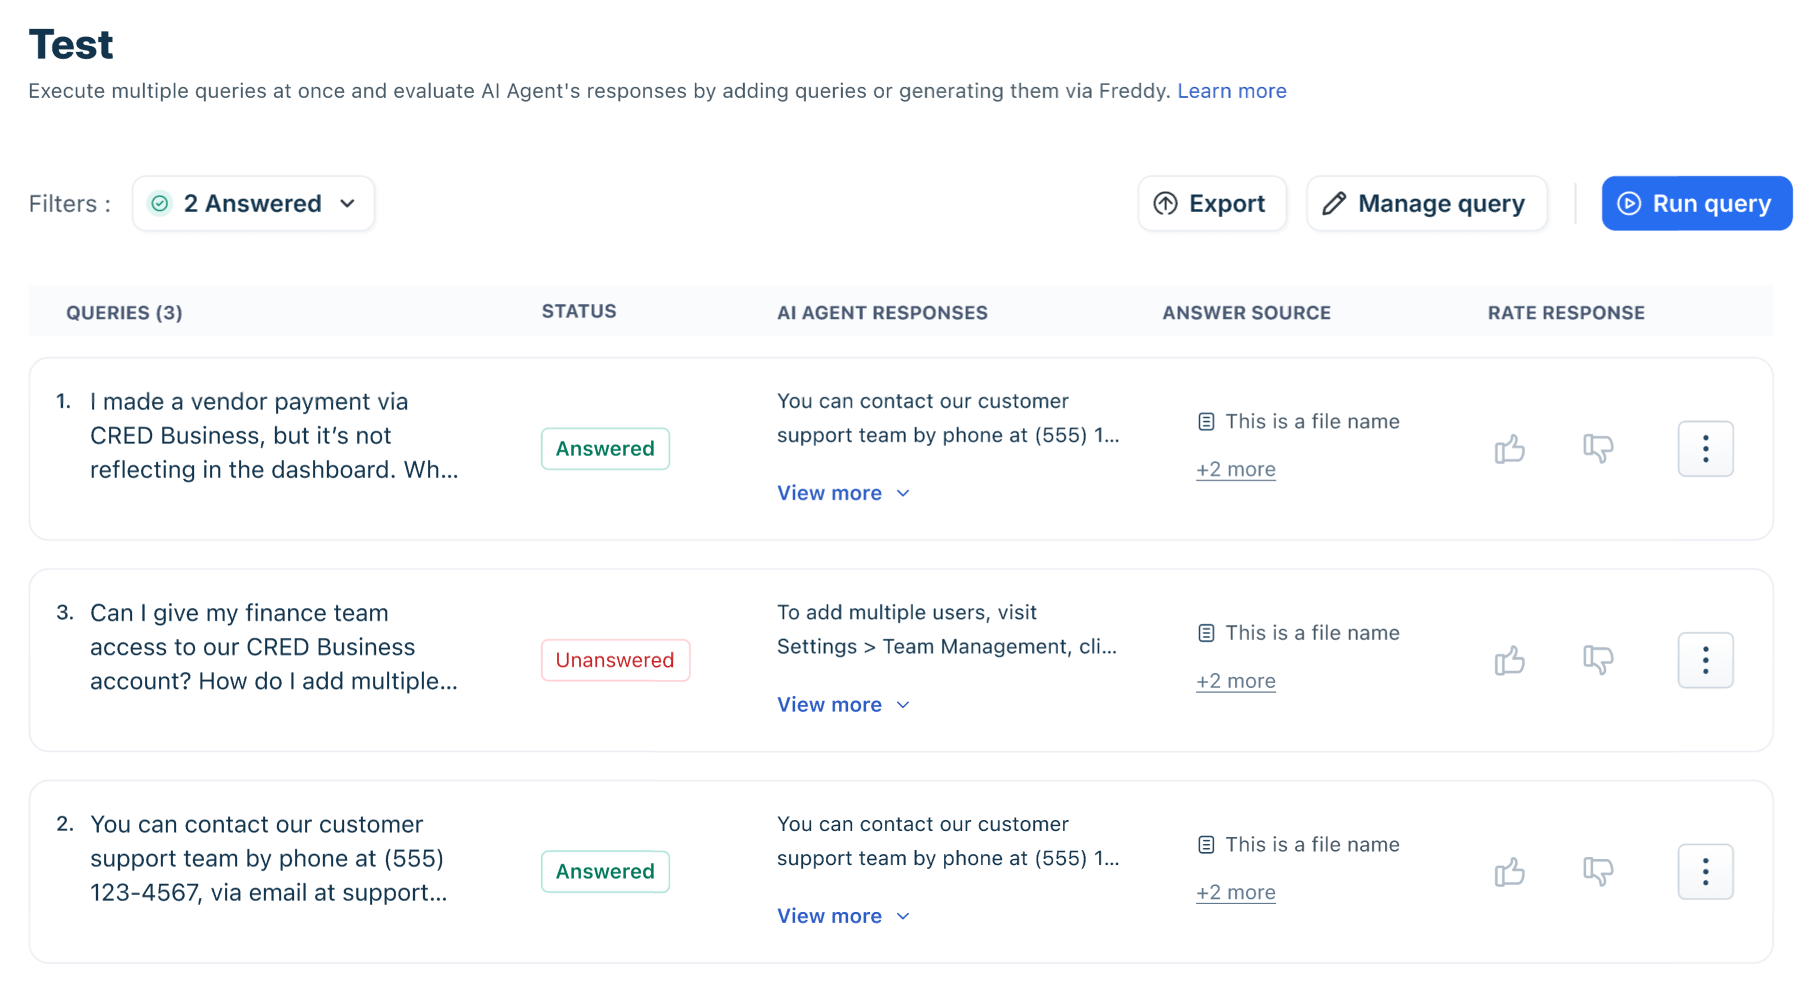
Test the AI Agent
Test and refine your AI agent's responses to evaluate bot performance and meet customer expectations. Whether you're deploying or fine-tuning, this feature enables admins to simulate real-world scenarios.
Beyond real-time query simulation, you can also run automated bulk testing matrices across large query datasets to validate performance before publishing.
For more details, see Test AI Agents.
Preview the AI Agent
Once you have configured and tested your AI Agent, use the Preview AI Agent option to view it as you configure it, or open it in a new tab.
Note: In preview mode, Agent transfers will not be performed for unanswered queries or when human agent support was requested.
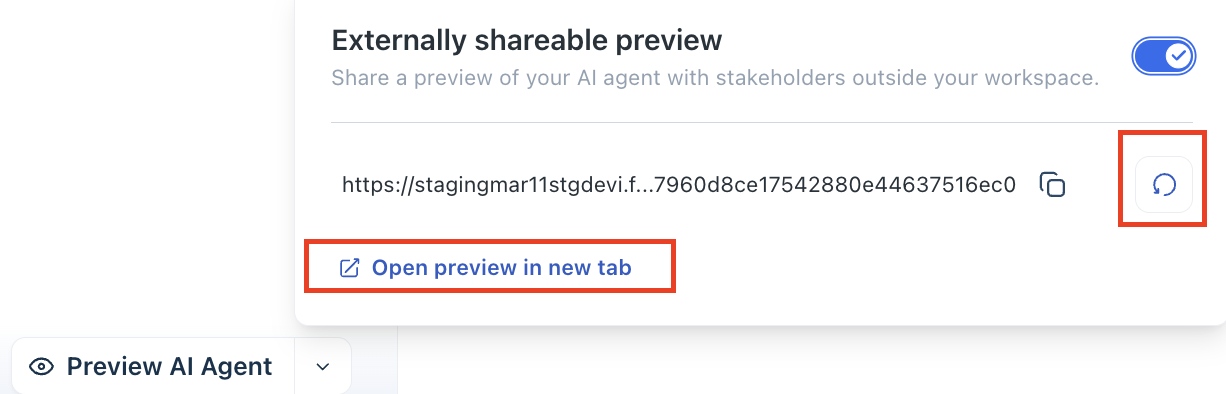
You can also create an externally shareable preview link for your AI Agent so that internal teams or stakeholders without agent licenses can test and provide feedback.
- On the AI Agent Studio page, click the dropdown next to Preview AI Agent.
- Toggle the Externally shareable preview option.
- Copy the generated link and share it with the stakeholders.
- Use the redo button to generate a different link.
Deploy the AI Agent
Once you’ve configured your AI Agents, you can deploy and map them to communication channels where your customers engage with you.
Mapping your AI Agent to channels ensures it can respond to customer queries in real time, maintain consistent conversational experiences, and provide immediate assistance. You can deploy your AI Agent on the following channels:
- Web Chat
- Instagram and many more
Note: If a Published AI agent is archived, it becomes unpublished and unmapped.
Channel mapping, triggers, and advanced configuration are explained in:
Chat AI Agent setup and channels
Email AI Agent setup and configuration
To deploy the AI Agent onto channels:
- On the AI Agent Studio page, click Deploy.
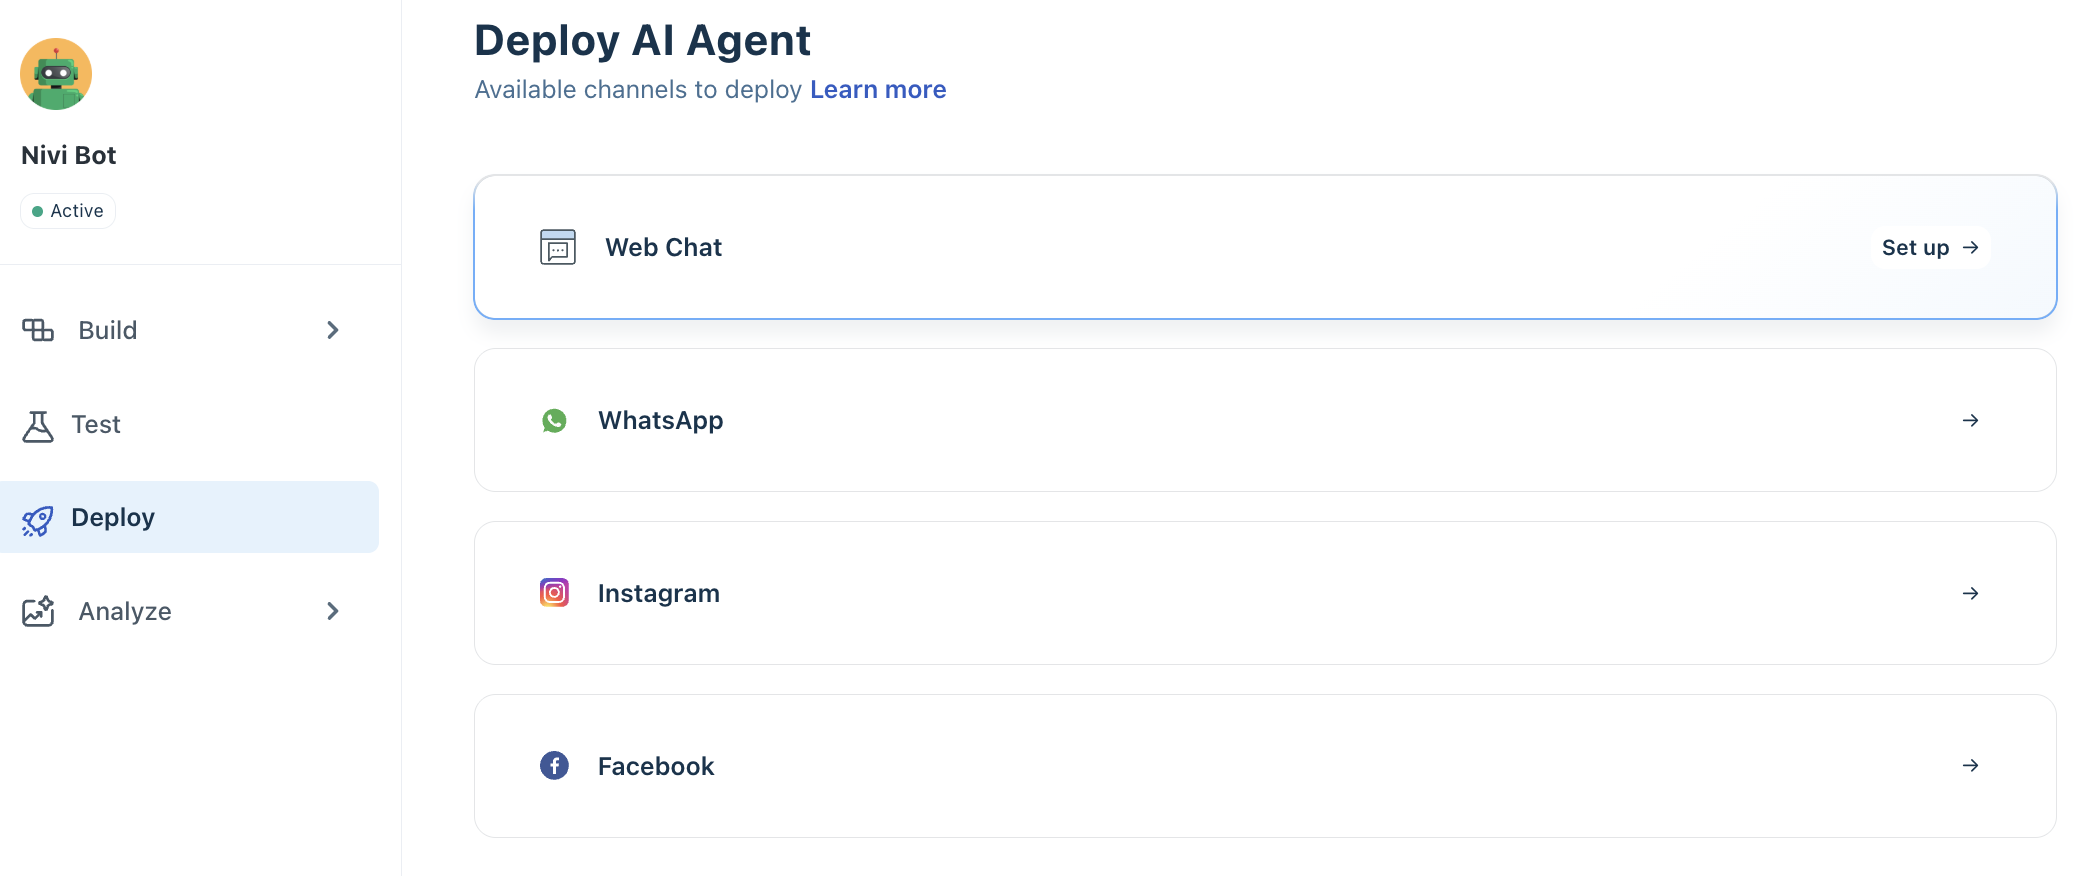
- Select the channel where you want to deploy the AI Agent, then click Set up. You will be redirected to the respective channel configuration page for the selected channel.
For example, if you choose Web Chat, you will be redirected to the Web Chat Topic Configuration page.
- Choose the Web Chat topic on which you want to deploy the AI Agent.
- Click Configure and enable Start with AI Agent.
- Choose the AI Agent to map.
- Click Publish.
The AI Agent will now be linked to the Web Chat widget associated with the Web Chat Topic. You can then deploy the widget on your website or product portal. For more details, see Create Web Chat Topics.
Analyze AI Agent performance
Once deployed, the focus shifts from setup to performance evaluation. AI Agents improve only when their behavior is monitored and refined based on real usage.
Evaluate detailed performance trends
The Performance tab helps you go deeper into how the agent behaves over time.
Instead of just showing totals, it reveals patterns such as:
- Whether automation is improving
- How consistently the agent performs
- Where performance varies across scenarios
This allows you to move from snapshot monitoring to trend analysis, which is critical for long-term optimization.
Drive continuous improvement using AI recommendations
The Improve tab closes the loop between performance and action.
Based on real conversations, it identifies:
- Missing or incomplete knowledge
- Queries that are not handled effectively
- Opportunities to improve clarity or accuracy
These recommendations are prioritized based on impact, helping you focus on changes that will meaningfully improve performance.
This transforms optimization from guesswork into a data-driven process.
Use logs for deeper diagnosis
When metrics highlight a problem, conversation logs help you understand why.
By reviewing actual interactions, you can:
- Identify recurring failure patterns
- Validate whether improvements are working
- Understand customer intent more clearly
This is essential for refining both knowledge and instructions.
For more details, see Analyze and monitor AI Agent performance.
Leverage AI Agent Studio library
Access pre-built, ready-to-go components in the Library section of AI Agent Studio. This no-code interface enables Admins to create new AI Agents, Agentic Workflows, and pre-built API Actions without writing a single line of code.
- AI Agents,
- Workflows, and
- API Actions
These libraries accelerate setup for common business needs and save development time.
Archive and restore AI Agents
Over time, you may have AI Agents that are no longer in use. Archiving helps you declutter your workspace, improve performance, and manage your AI Agent inventory more efficiently—without immediately losing data.
To archive an AI agent,
- Go to AI Agent Studio from the left nav bar.
- Click the three-dot ellipsis menu next to the AI Agent.
- Select Archive and confirm.
Once archived,
- The AI Agent is removed from all channels
- It is moved to the Archived view
- It no longer appears in the active list
Archived AI Agents are not deleted immediately and can be accessed separately. To view and restore the archived AI agents,
- Go to the Show filter section.
- Select Archived from the dropdown.

- Click the three-dot menu next to the AI Agent.
- Select Restore and confirm.
After restoration,
- The AI Agent moves back to the active list
- You must republish the AI Agent
- Reconfigure channel mappings, as they are not restored automatically
Key considerations
- Retention period: Archived AI Agents are permanently deleted after 30 days
- Data impact: Bot configurations are deleted after 30 days; analytics and past conversations remain unaffected
- Access: Users with AI Agent permissions can archive and restore
- Limits: If you’ve reached the AI Agent limit, you may need to archive an active agent before restoring another