TABLE OF CONTENTS
- Set up conversation behaviour
- Send an introductory message
- Send fallback message
- Collect user feedback
- Collect user details
- Supported languages
This section lets you customize your AI Agent’s tone, messaging, and supported languages to reflect your brand voice and create more engaging customer interactions. For details on the complete AI Agent setup, see Create an AI Agent using the AI Agent Studio.
Set up conversation behaviour
To configure AI Agent behaviour:
- Log in to your account.
- From the left navigation pane, click AI Agent Studio .
- Select your AI Agent > Build > behavior.
- You can configure the following:
- Send introductory message
- Send fallback message
- Collect feedback
- Collect user details
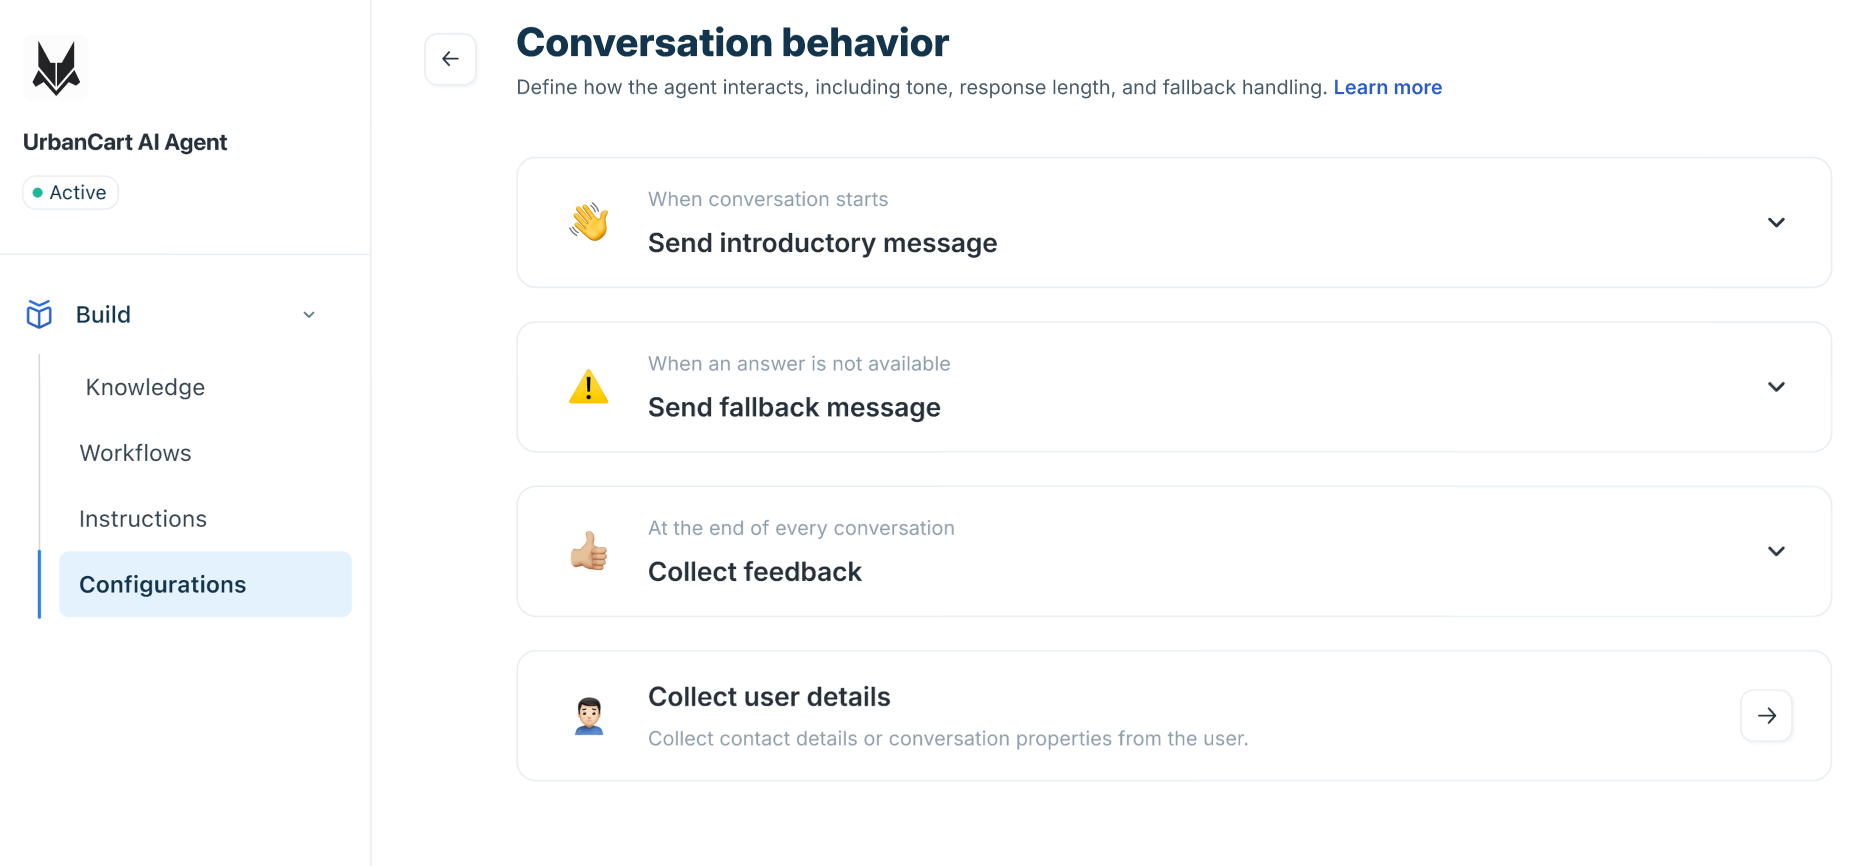
You can use the default pre-configured messages or customize them to ensure they align with your brand voice and enhance customer engagement.
Send an introductory message
The Introductory message is the customer's first interaction with your AI Agent. Personalizing this message can set the right tone and increase engagement.
The message editor supports:
- Rich text formatting
- Hyperlinks
- Emojis
- Placeholders
- Multiple languages
After configuring the message, you can optionally define what happens next.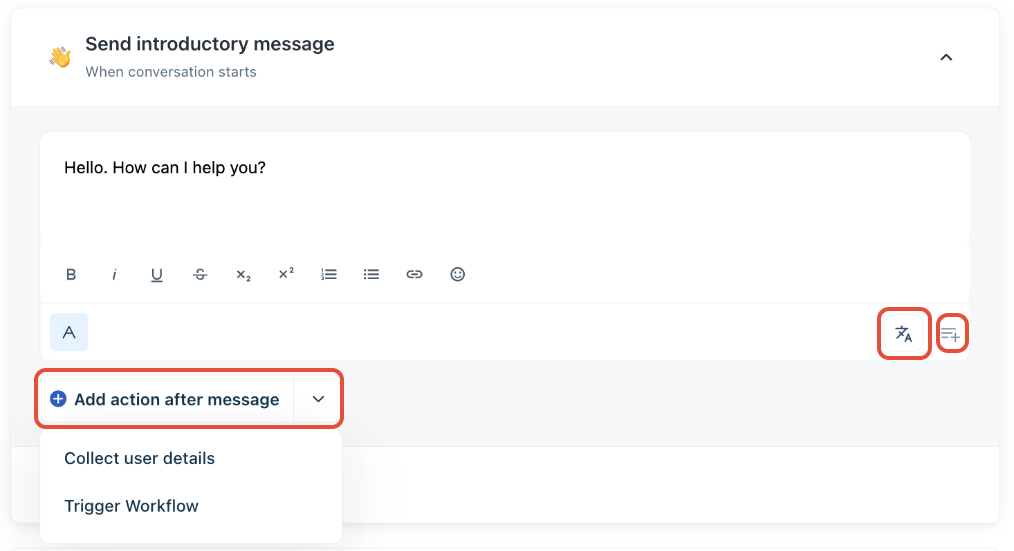
Configure an action after the introductory message
After the introductory message is sent, you can configure one of the following actions:
- Collect user details – Prompt customers to provide configured contact or conversation properties before continuing the conversation.
- Trigger Workflow – Start a Workflow immediately after the introductory message is delivered.
If Collect user details is selected, the AI Agent sends the introductory message first, then prompts customers for the properties configured under Collect user details > During introduction.
If Trigger Workflow is selected, the AI Agent starts the configured Workflow immediately after sending the introductory message.
To configure the introductory message.
- On the AI Agent's Configurations section > Conversation behaviour tab, click Send introductory message .
- Enter or edit the message.
- Click Add action after message and select either Collect user details or Trigger Workflow.
- Click Review translations to verify and edit the auto-translated message. Click Manage languages link to add or remove supported languages.
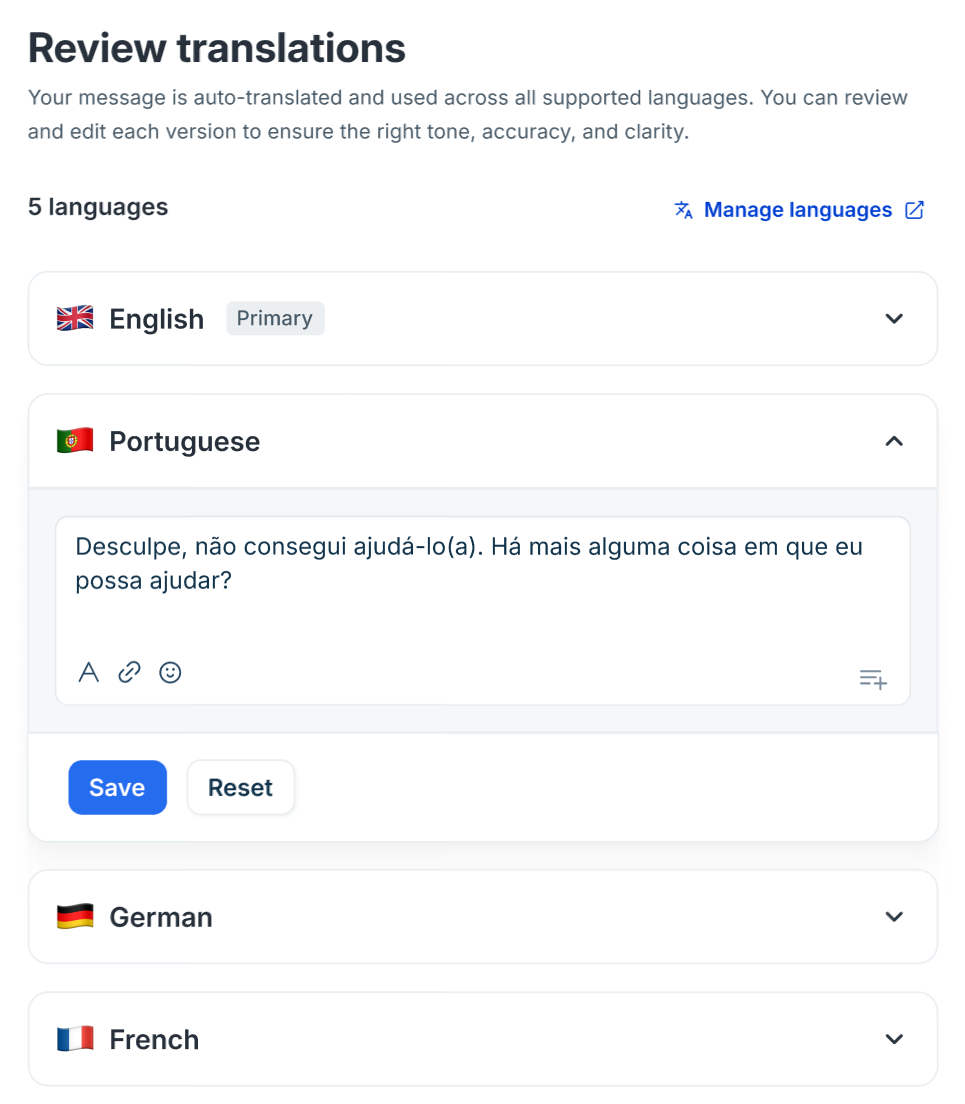
- Click Save .
Send fallback message
When the AI Agent cannot respond to a customer’s query, a fallback message is displayed. This message helps manage customer expectations and keeps the conversation ongoing, even when the AI Agent doesn’t have an answer.
Choose the fallback action
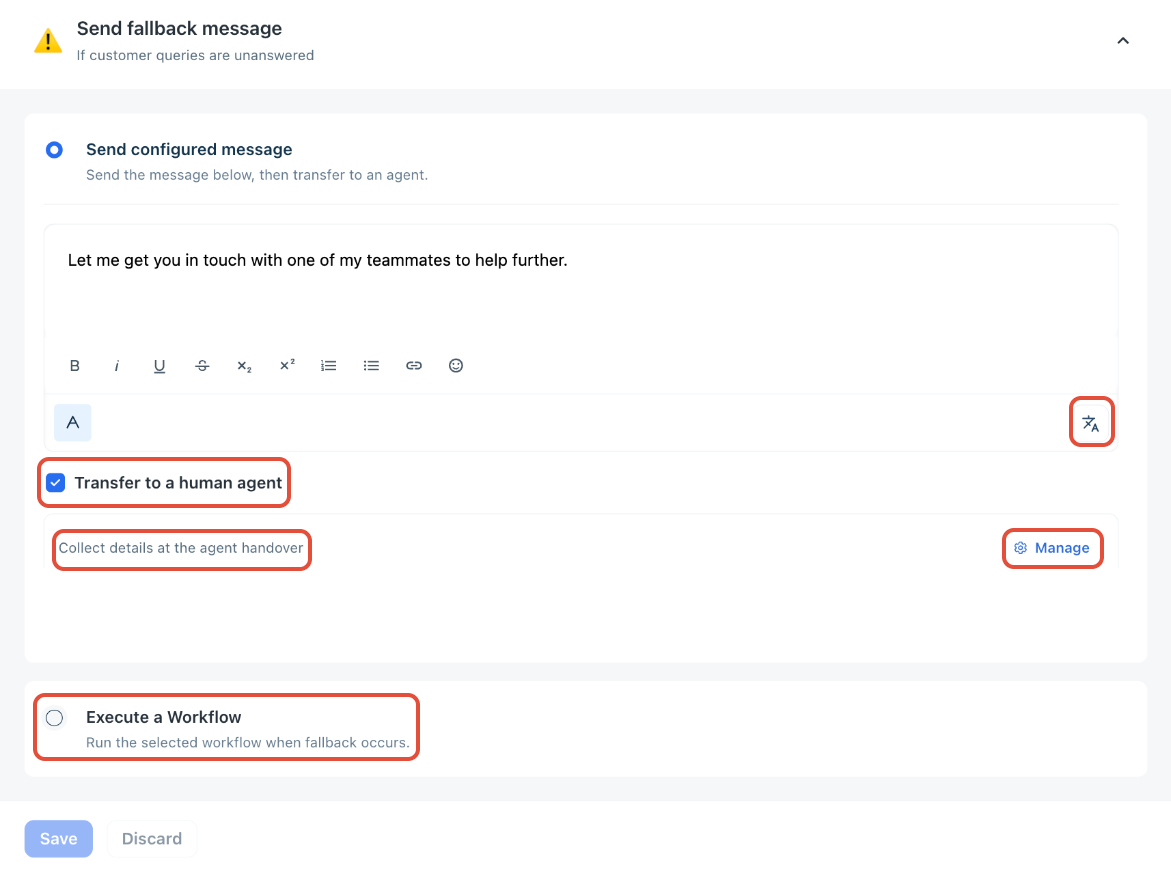
When a fallback occurs, you can configure one of the following actions:
- Send configured message
- Execute a Workflow
Send configured message
This option sends a custom message to the customer when a fallback occurs. You can use the rich text editor to format the message, add links, emojis, and translations.
You can also enable Transfer to a human agent to automatically hand over the conversation after sending the fallback message.
When enabled, selecting Manage opens the Collect user details page, where you can configure the properties to collect before the handover.
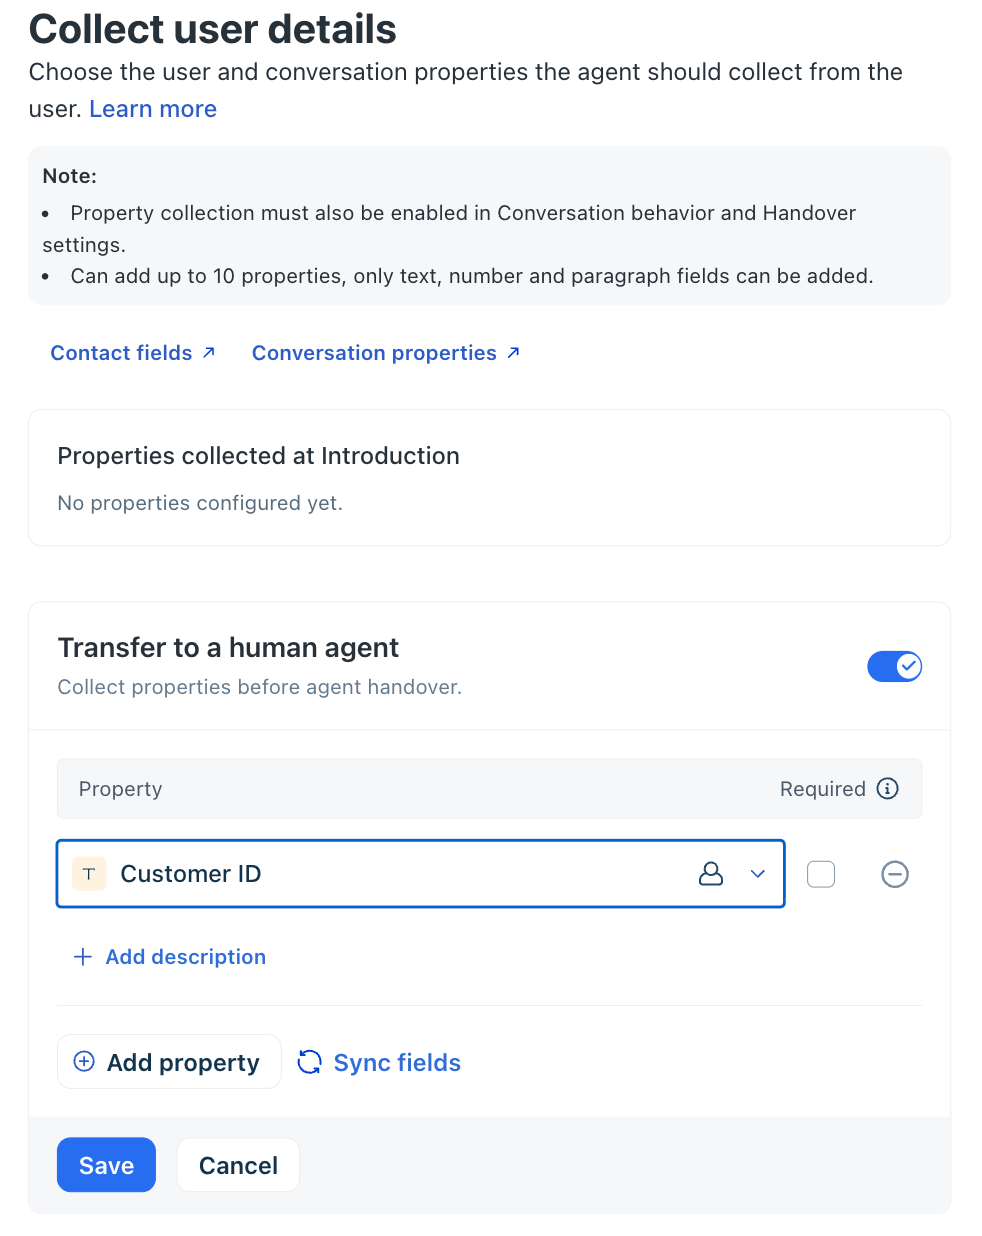
If property collection for handover has not been configured, the page displays a reminder prompting you to enable and configure it.
Execute a Workflow
Instead of displaying a fallback message, you can choose Execute a Workflow. When selected, the AI Agent immediately starts the configured Workflow upon a fallback.
This is useful for routing unanswered queries through guided processes instead of immediately escalating to a human agent.
To configure the fallback behavior:
- On the AI Agent's Configurations section > Conversation behavior tab, click Send fallback message.
- Expand Send fallback message.
- Select one of the following:
- Send configured message
- Execute a Workflow
- Configure the selected action.
Click Review translations to verify and edit the auto-translated message, used across all supported languages to ensure the correct tone, accuracy, and clarity.
- Click Save.
Collect user feedback
Collecting feedback from your customers helps you continuously improve the accuracy and overall experience of your AI Agent. You can customize the feedback prompt using rich text, links, and emojis to make it more engaging and consistent with your brand voice.
How is feedback collected?
If feedback collection is enabled:
- It is triggered when responses are provided through Knowledge Sources or Workflows.
- For Workflows, feedback is collected after the entire Workflow is completed. However, if the final block in the Workflow transfers the conversation to an agent, feedback will not be sent.
To configure the feedback message:
- On the AI Agent's Configurations section > Conversation behaviour tab > Collect feedback > toggle on Always ask for feedback.
- Set the feedback message (e.g.: Was this helpful?)
- Select the AI agent's response: resolve, transfer to a human agent, or do nothing, based on the feedback.
- Add the positive (Yes) and negative (No) text messages for the customer to choose from.
- Click Save.
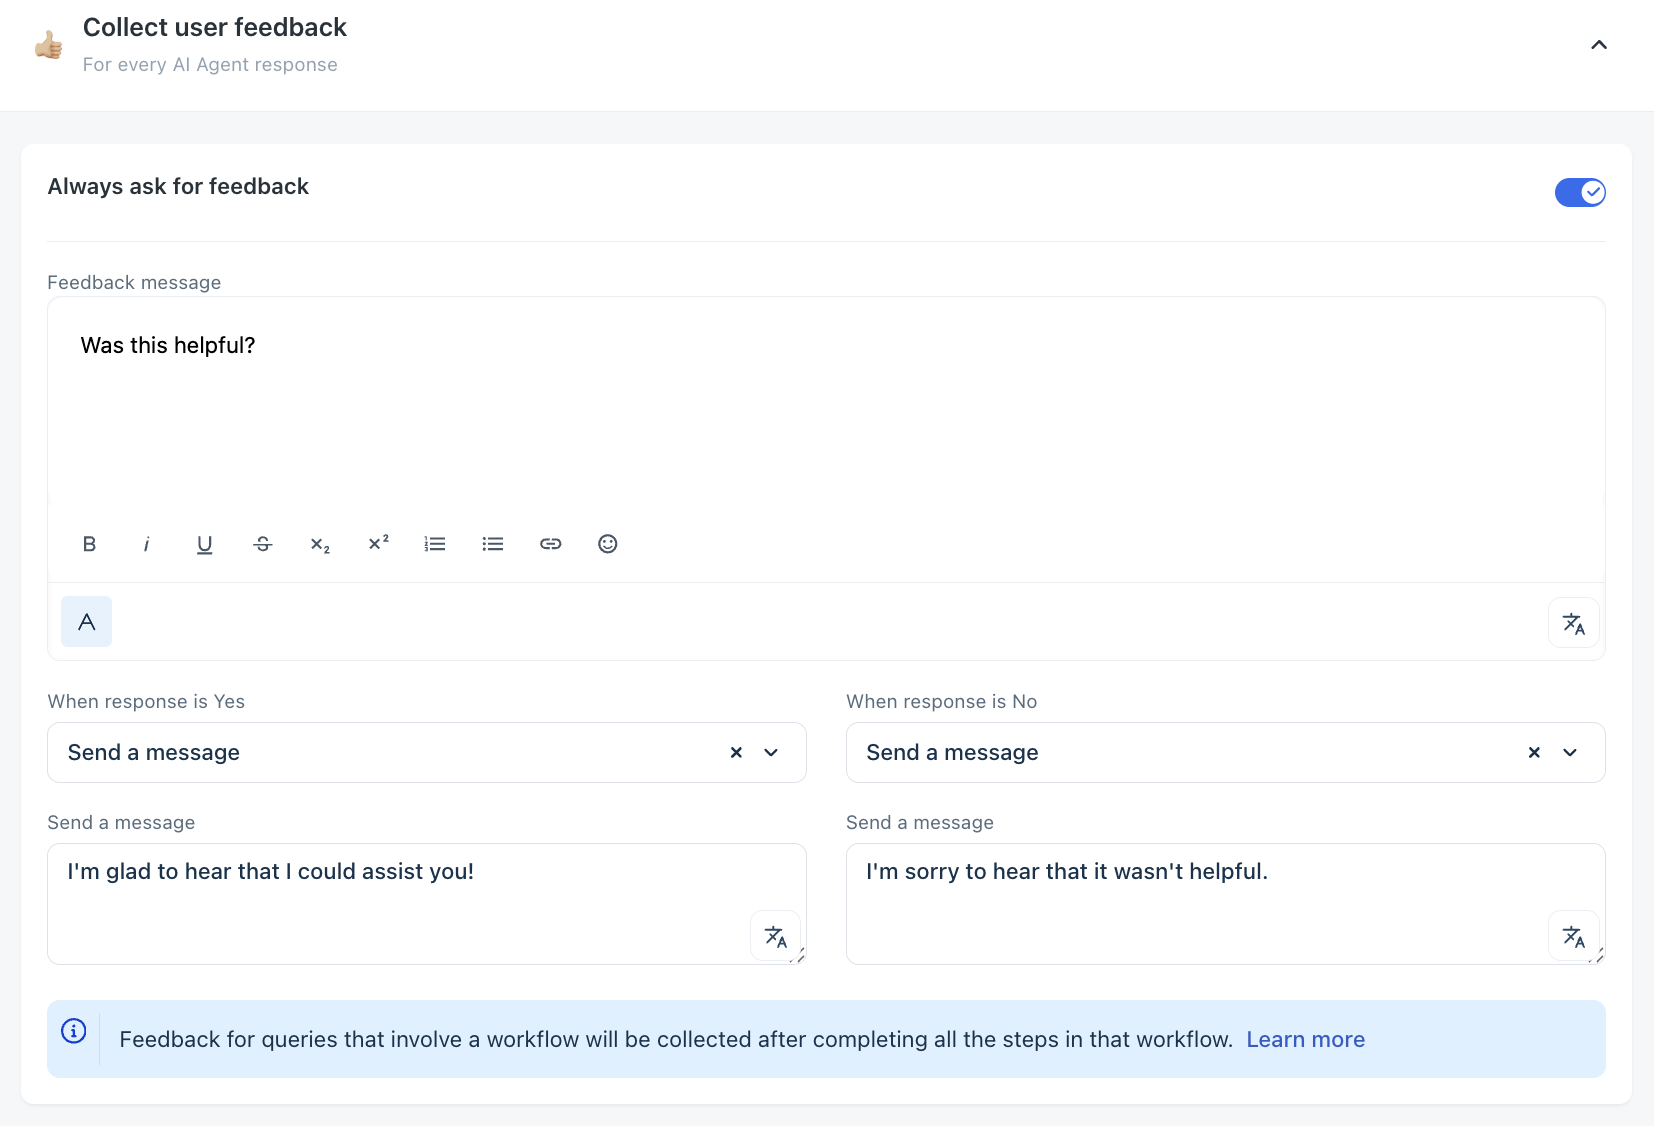
Note: For Workflows, feedback is collected after the entire Workflow is completed.
Collect user details
Collect user details allows the AI Agent to gather customer information at specific stages of a conversation. The collected information is stored as Contact fields or Conversation properties and can be used during the conversation or before a human agent takes over.
You can configure the AI Agent to collect details in the following scenarios:
- During introduction – Collect information at the beginning of the conversation.
- Transfer to a human agent – Collect information before the conversation is handed over to an agent.
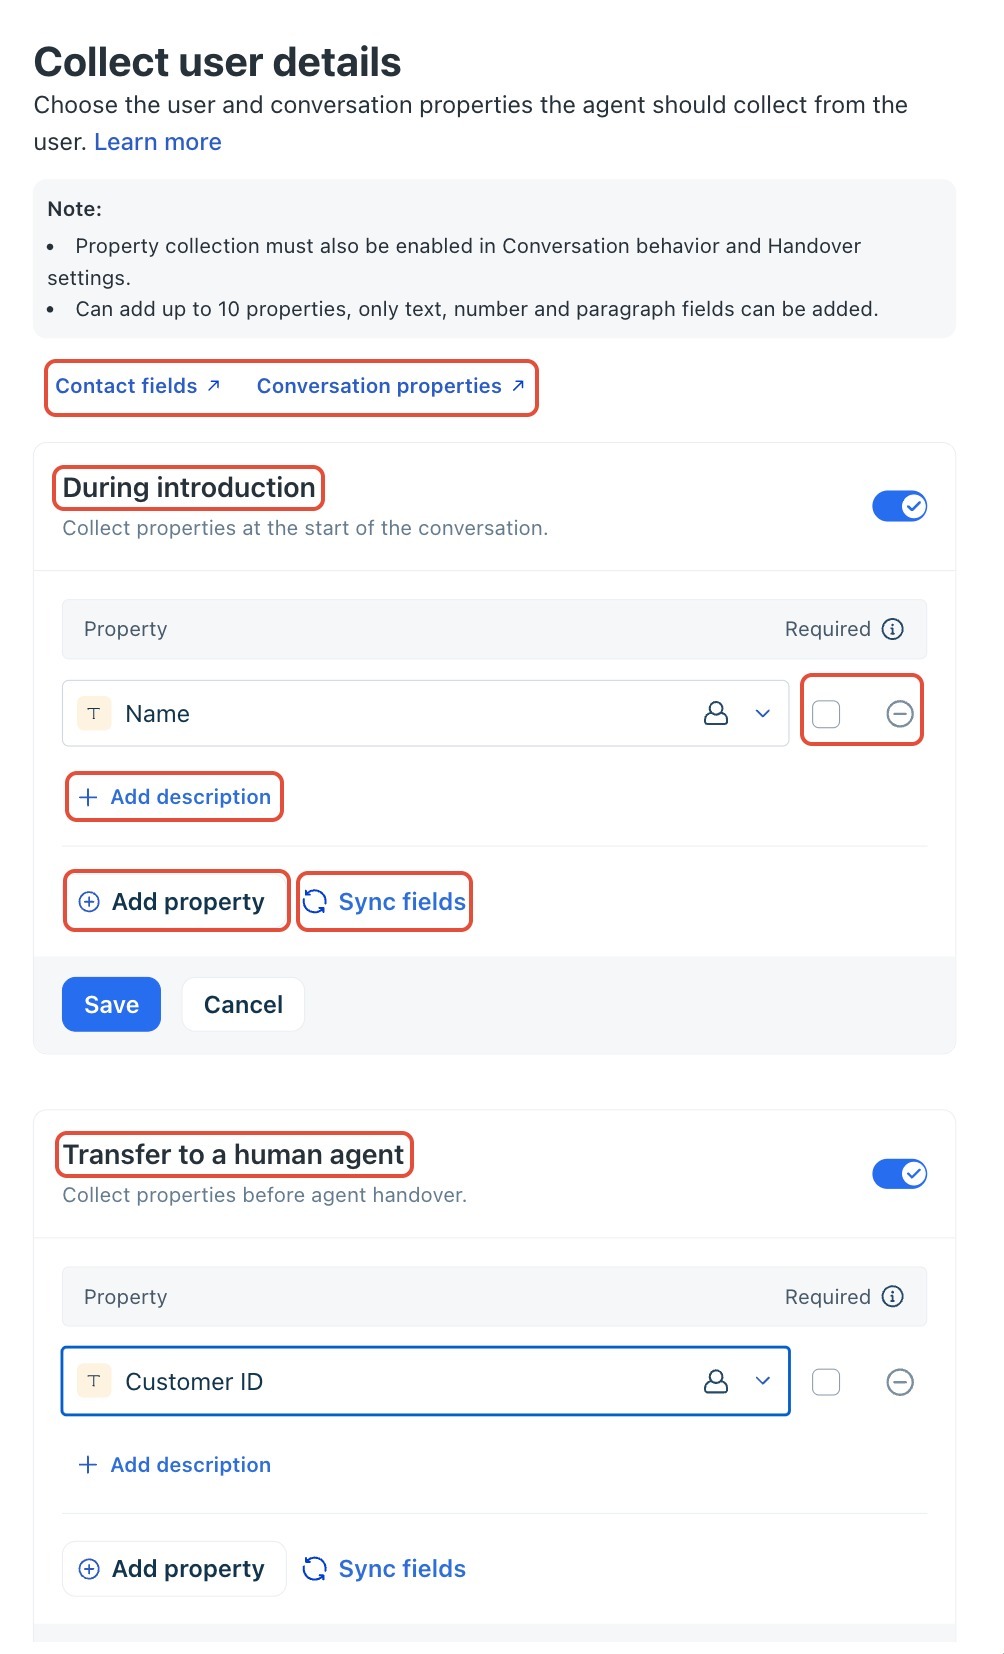
You can collect up to 10 properties . Only Text , Number , and Paragraph fields are supported.
During introduction
Collect information immediately after the introductory message.
Use this option for information that should be available throughout the conversation, such as:
- Name
- Email address
- Phone number
- Customer ID
This section is triggered only when Collect user details is selected as the action after the introductory message in the Conversation behavior.
Tip: Click Sync fields to refresh the available Contact fields and Conversation properties if they have been recently added or modified.
Transfer to a human agent
Collect additional information before handing the conversation over to a human agent.
This helps agents receive important context before joining the conversation, reducing the need to ask customers for the same information again.
Examples include:
- Customer ID
- Reference number
- Order number
This section is used only when Transfer to a human agent is enabled from the Send fallback message configuration.
Selecting Manage from the fallback settings opens this page directly.
Notes
Property collection must also be enabled in the Conversation behaviour and Handover settings.
Collecting unique identifiers such as Email and Phone Number from visitors may have security implications.
Manage and remove properties
You can modify or stop collecting properties at any time.
To manage configured properties:
- Turn off During introduction or Transfer to a human agent to disable property collection for that stage.
- Click the minus (-) icon next to a property to remove it.
- Click Sync fields to refresh Contact fields and Conversation properties after making changes in your account.
- Click Save to apply the changes.
If you enable a section without adding any properties, the page displays a validation message indicating that at least one property must be configured before saving.
If a property has been removed from your Contact fields or Conversation properties, select another supported property or remove the invalid entry before saving your configuration.
Notes:
1. Collecting unique properties like Email and Phone number from visitors might have a security impact.
2. When workflows retrieve sensitive data (orders, refunds, account info):
3. If user properties are pre-filled through the widget script, the AI Agent automatically uses them and skips additional prompts.
4. If not, the admin must ensure the workflow explicitly collects:
    Order ID
    Email or another unique identifier
    Validate both before responding

For best results,configure the widget to pass verified user properties.
To collect user details:
- On the AI Agents Configurations section > Conversation behaviour tab > select Collect user details.
- On the Collect user details pane, specify the following:
- Collect the user details during the Introduction or when transferring to a human agent .
- Properties that the AI Agent should collect:
- Choose from available text, paragraph, or number fields.
- Add description to provide additional context, if needed.
- You can mark the fields as Required. Properties that are not marked as Required can be skipped if the customer denies them or requests other information.
- Click Sync fields to automatically refresh contact fields when properties are added or removed.
- Click Save.
Supported languages
By default, the AI Agent understands queries in all languages and responds in the following manner:
- If the user's query is in one of the added languages in the supported languages section: The AI Agent will reply in the language of the query.
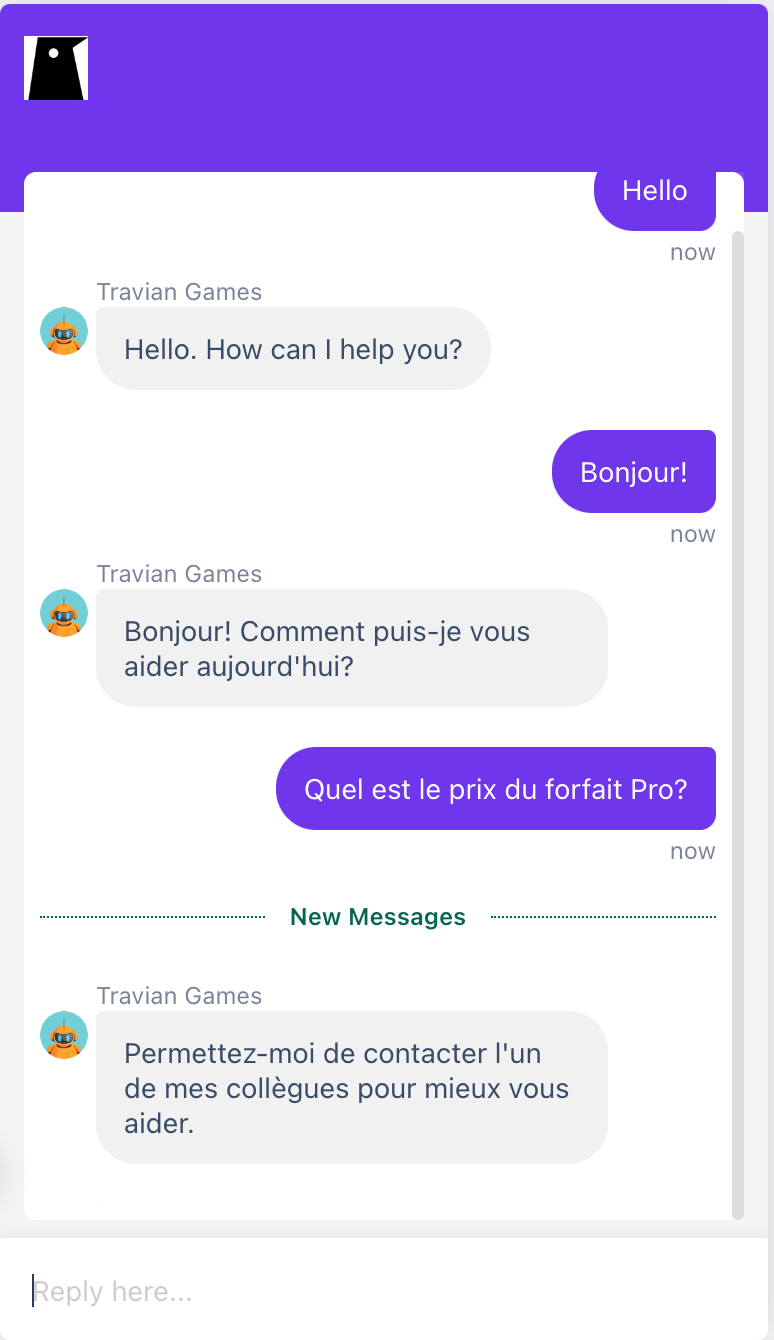
- If the user query is outside the added languages in the supported languages section: The AI Agent will respond in the primary language with a language disclaimer: “Apologies! I am trained to answer in <added languages>”
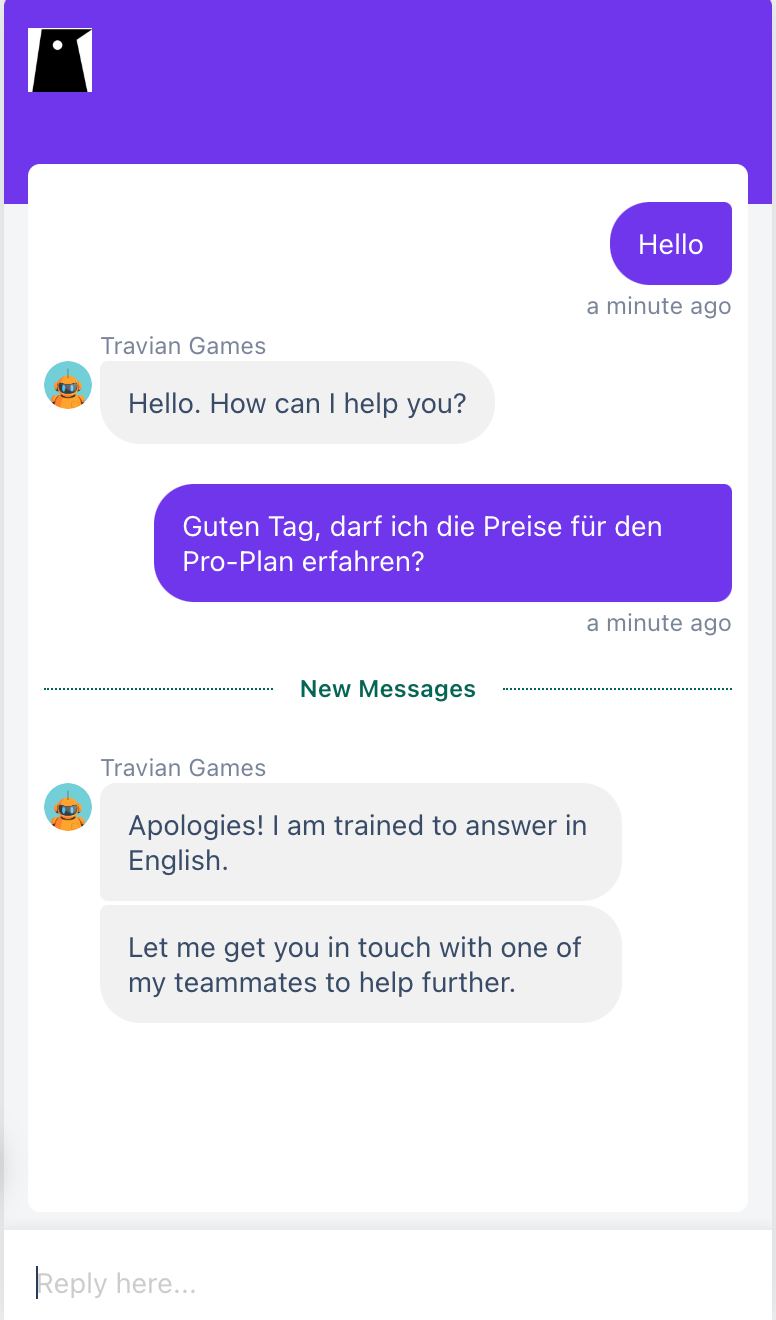
The supported languages include the following -
Amharic | Assamese | Bengali | Bosnian | Bulgarian |
Catalan | Chinese | Chinese (Traditional) | Croatian | Czech |
Danish | Dutch | English | Estonian | Filipino |
Finnish | French | German | Greek | Gujarati |
Hebrew | Hindi | Hungarian | Icelandic | Indonesian |
Italian | Japanese | Kannada | Kazakh | Khmer |
Korean | Kurdish | Latvian | Lithuanian | Malay |
Malayalam | Marathi | Nepali | Norwegian | Odia |
Polish | Portuguese (BR) | Portuguese (Portugal) | Punjabi | Romanian |
Russian | Serbian | Sinhalese | Slovak | Slovenian |
Somali | Spanish | Spanish (Latin America) | Swahili | Swedish |
Tamil | Telugu | Thai | Turkish | Ukrainian |
Urdu | Vietnamese | Welsh |