TABLE OF CONTENTS
- Complete administrator setup
- Reconnect channels and go live
- Complete upgrade and go live
- Next steps after the upgrade
Articles in the Freshdesk Omni 2025 upgrade series
|
This article is part 3 of the Freshdesk Omni 2025 upgrade guide for accounts with high Freshchat usage.
It explains how to complete the administrator setup for configurations that could not be automatically transferred from the previous stage or settings that require additional manual steps.
Note: This upgrade article applies only to Freshdesk Omnichannel Classic and Freshdesk Omni 2023 (CSS) accounts with high Freshchat usage. If your account has no significant Freshchat configurations, follow the standard upgrade process described in the Freshdesk Omni 2025 upgrade overview.
Prerequisites
- Ensure that you have Account administrator or Administrator permissions.
Note: While administrators can complete the setup tasks described in this article, only Account administrators can complete the final upgrade. - Before starting this phase, you must finish Part 2: Initiate Freshdesk Omni 2025 upgrade and transfer configurations.
We also recommend that you read the Detailed upgrade guide for Freshdesk Omni 2025. This provides a comprehensive summary of the upgrade along with the various stages involved in the process.
The final stage of the upgrade includes the following:
- Complete administrator setup: Review the transferred configurations and complete the setup actions that require manual intervention.
- Reconnect channels and go live: Reconnect the channels transferred during Stage 1, review their configuration, and verify that they're ready to receive customer conversations. Additionally, review all configurations before going live
Complete administrator setup
After you transfer your configurations, some items require additional setup before you can proceed with the final upgrade. During this stage, review the transferred configurations, complete the required administrator actions, and recreate configurations that require manual setup.
The upgrade wizard in this stage displays only the tasks that apply to your account. As you complete each task, the progress indicator is updated to help you track the remaining actions before you proceed to the final stage.
The following sections cover the most common admin setup tasks:
- Marketplace apps
- Custom dashboards
- Custom reports
- Scheduled automations
Reinstall marketplace apps
Review the marketplace apps in your Freshchat account and reinstall them to ensure they continue functioning in Freshdesk Omni 2025. The upgrade wizard will display your installed apps and suggest alternate public apps from the Freshworks Marketplace.
For example, if your account uses a custom or legacy integration, the wizard might suggest an alternate public marketplace app that offers the same features. You can install the recommended app or opt for a different solution that better suits your business needs.
Important: Some marketplace apps require you to reauthorize the connection or complete additional configuration after installation. Review the app-specific documentation before using the app in production.
To reinstall marketplace apps:
- In the upgrade wizard, go to Set up admin actions > Marketplace apps.
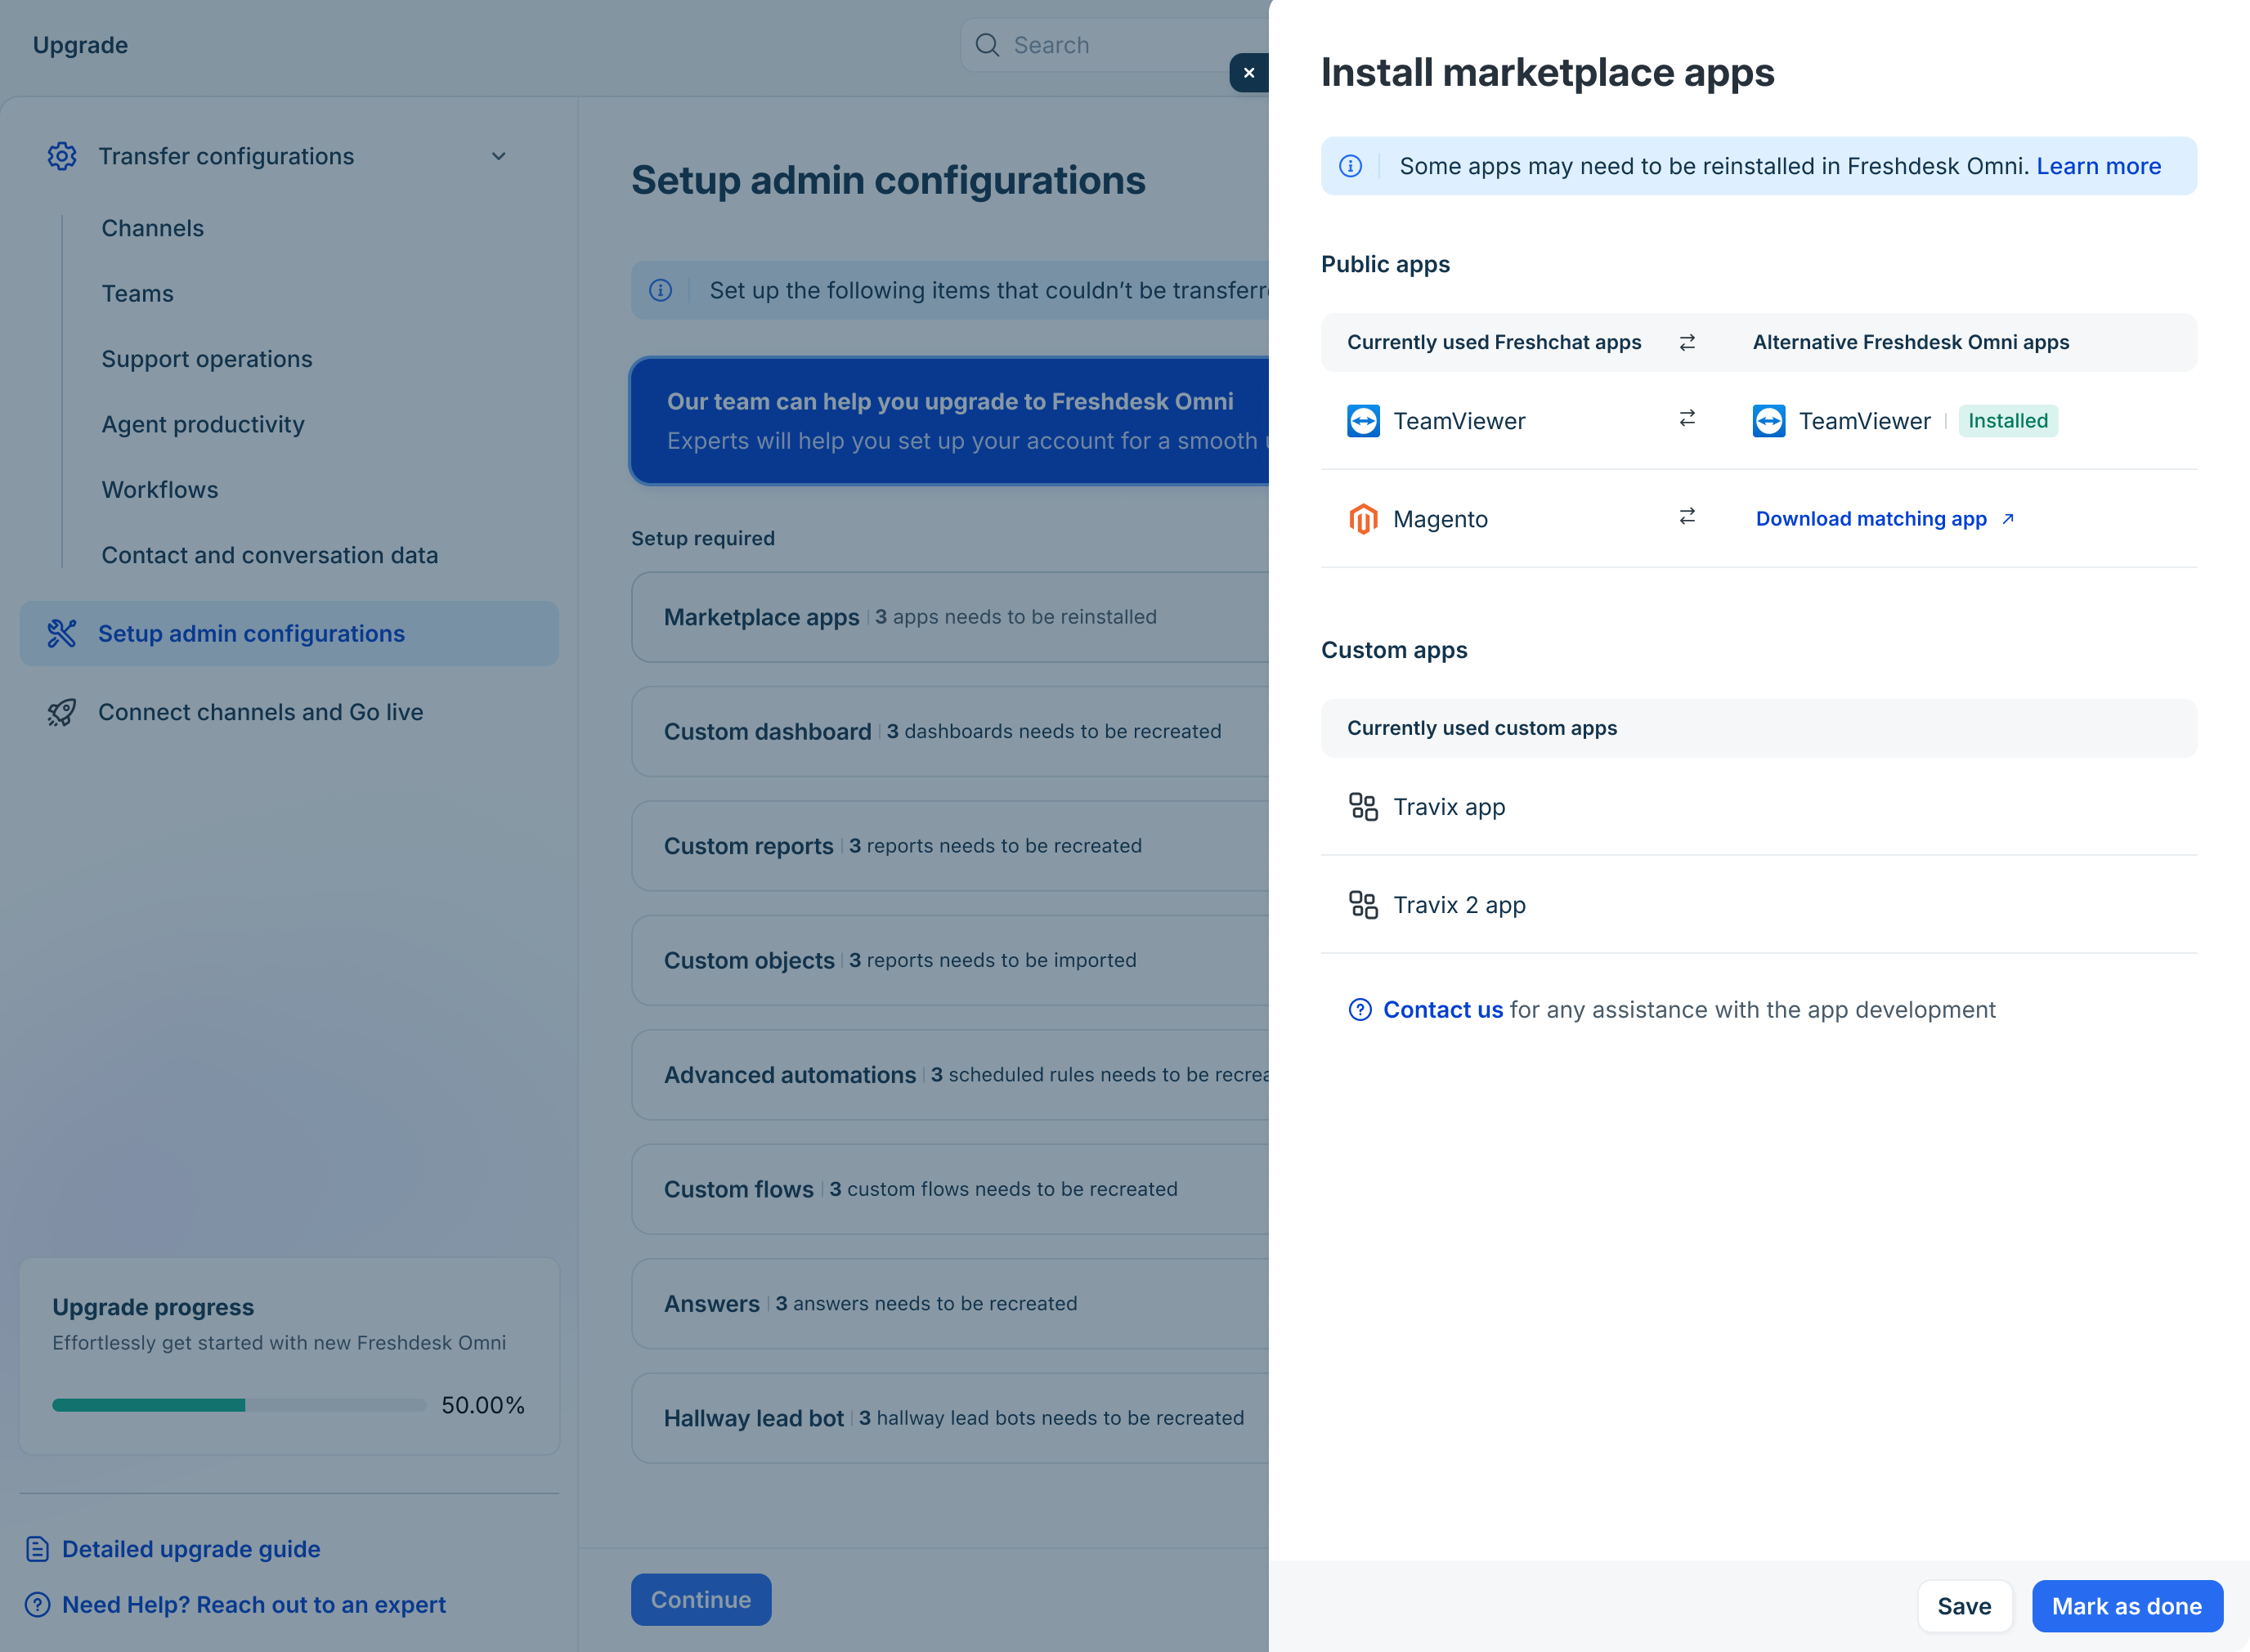
- Review the list of installed marketplace apps and any recommended alternate public apps.
- Click Install for each app that you want to use in Freshdesk Omni 2025.
- Complete the installation, authorization, and any additional configuration required by the app.
- Repeat these steps for the remaining marketplace apps.
- Click Mark as done.
Recreate custom dashboards
Custom dashboards help administrators track support operations and business metrics. If your team depends on custom dashboards for reporting, recreate the dashboards in Freshdesk Omni 2025 before completing the upgrade.
As you recreate the dashboards, review the existing reports and include only those that are still relevant to your support operations.
To recreate custom dashboards:
- In the upgrade wizard, go to Set up admin actions > Custom dashboards.
- Review the list of dashboards available in your existing account.
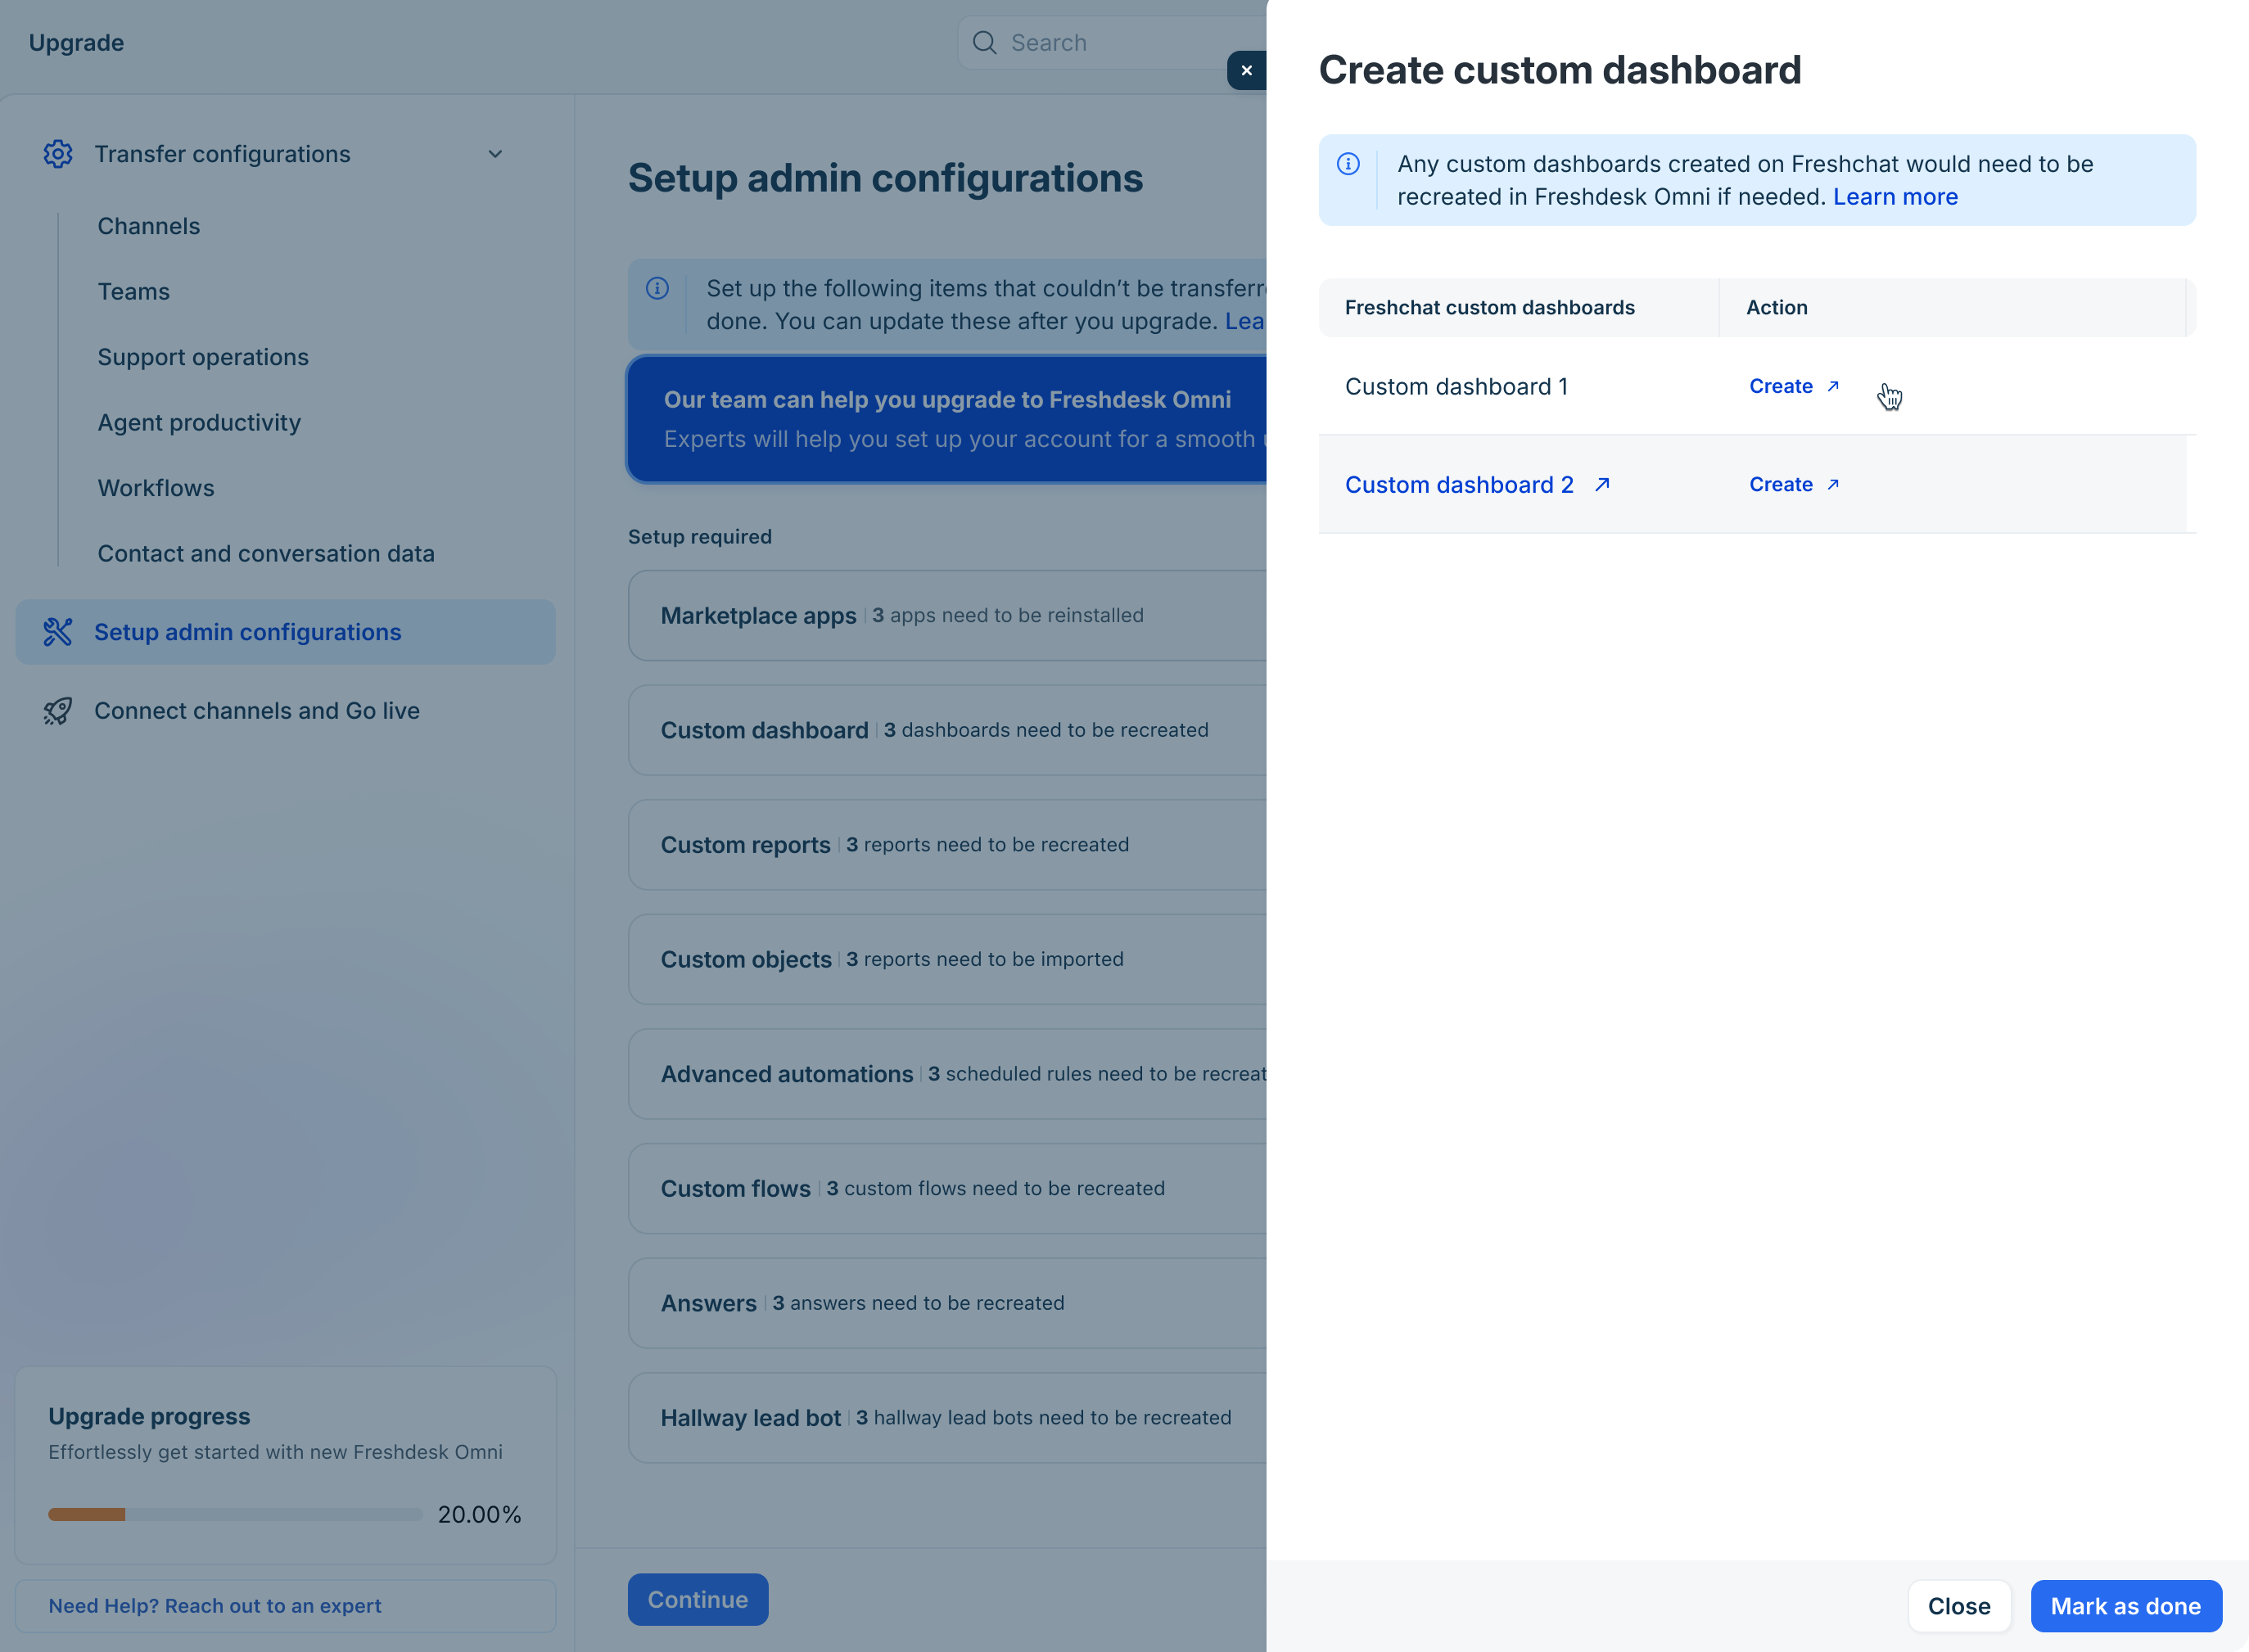
- Open Analytics in Freshdesk Omni 2025.
- Recreate the required dashboards.
- Return to the upgrade wizard and click Mark as done.
Recreate scheduled automations as quick automations
Quick automations help you schedule recurring workflow actions without manual intervention. Review your existing scheduled workflows and recreate the ones your team still requires as Quick automations in Freshdesk Omni 2025.
To recreate quick automations:
- In the upgrade wizard, go to Set up admin actions > Quick automations.
- Review the workflows that require recreation.
- Open Automations in Freshdesk Omni 2025.
- Create the required quick automations. For instructions, see Quick automations.
- Verify that each automation performs the expected actions.
- Return to the upgrade wizard and click Mark as done.
Reconnect channels and go live
After completing stage 1 and stage 2, you can proceed with the final stage of the upgrade. During this stage, reconnect the transferred channels, review your configuration, and complete the final upgrade to start routing customer conversations through Freshdesk Omni 2025.
Reconnect channels
Reconnect the channels that you transferred during Stage 1: Transfer channel configurations. This ensures each channel is authorized and ready to receive customer conversations in Freshdesk Omni 2025.
Each channel must be reconnected individually. The upgrade wizard redirects you to the corresponding channel configuration page, where you can complete the setup.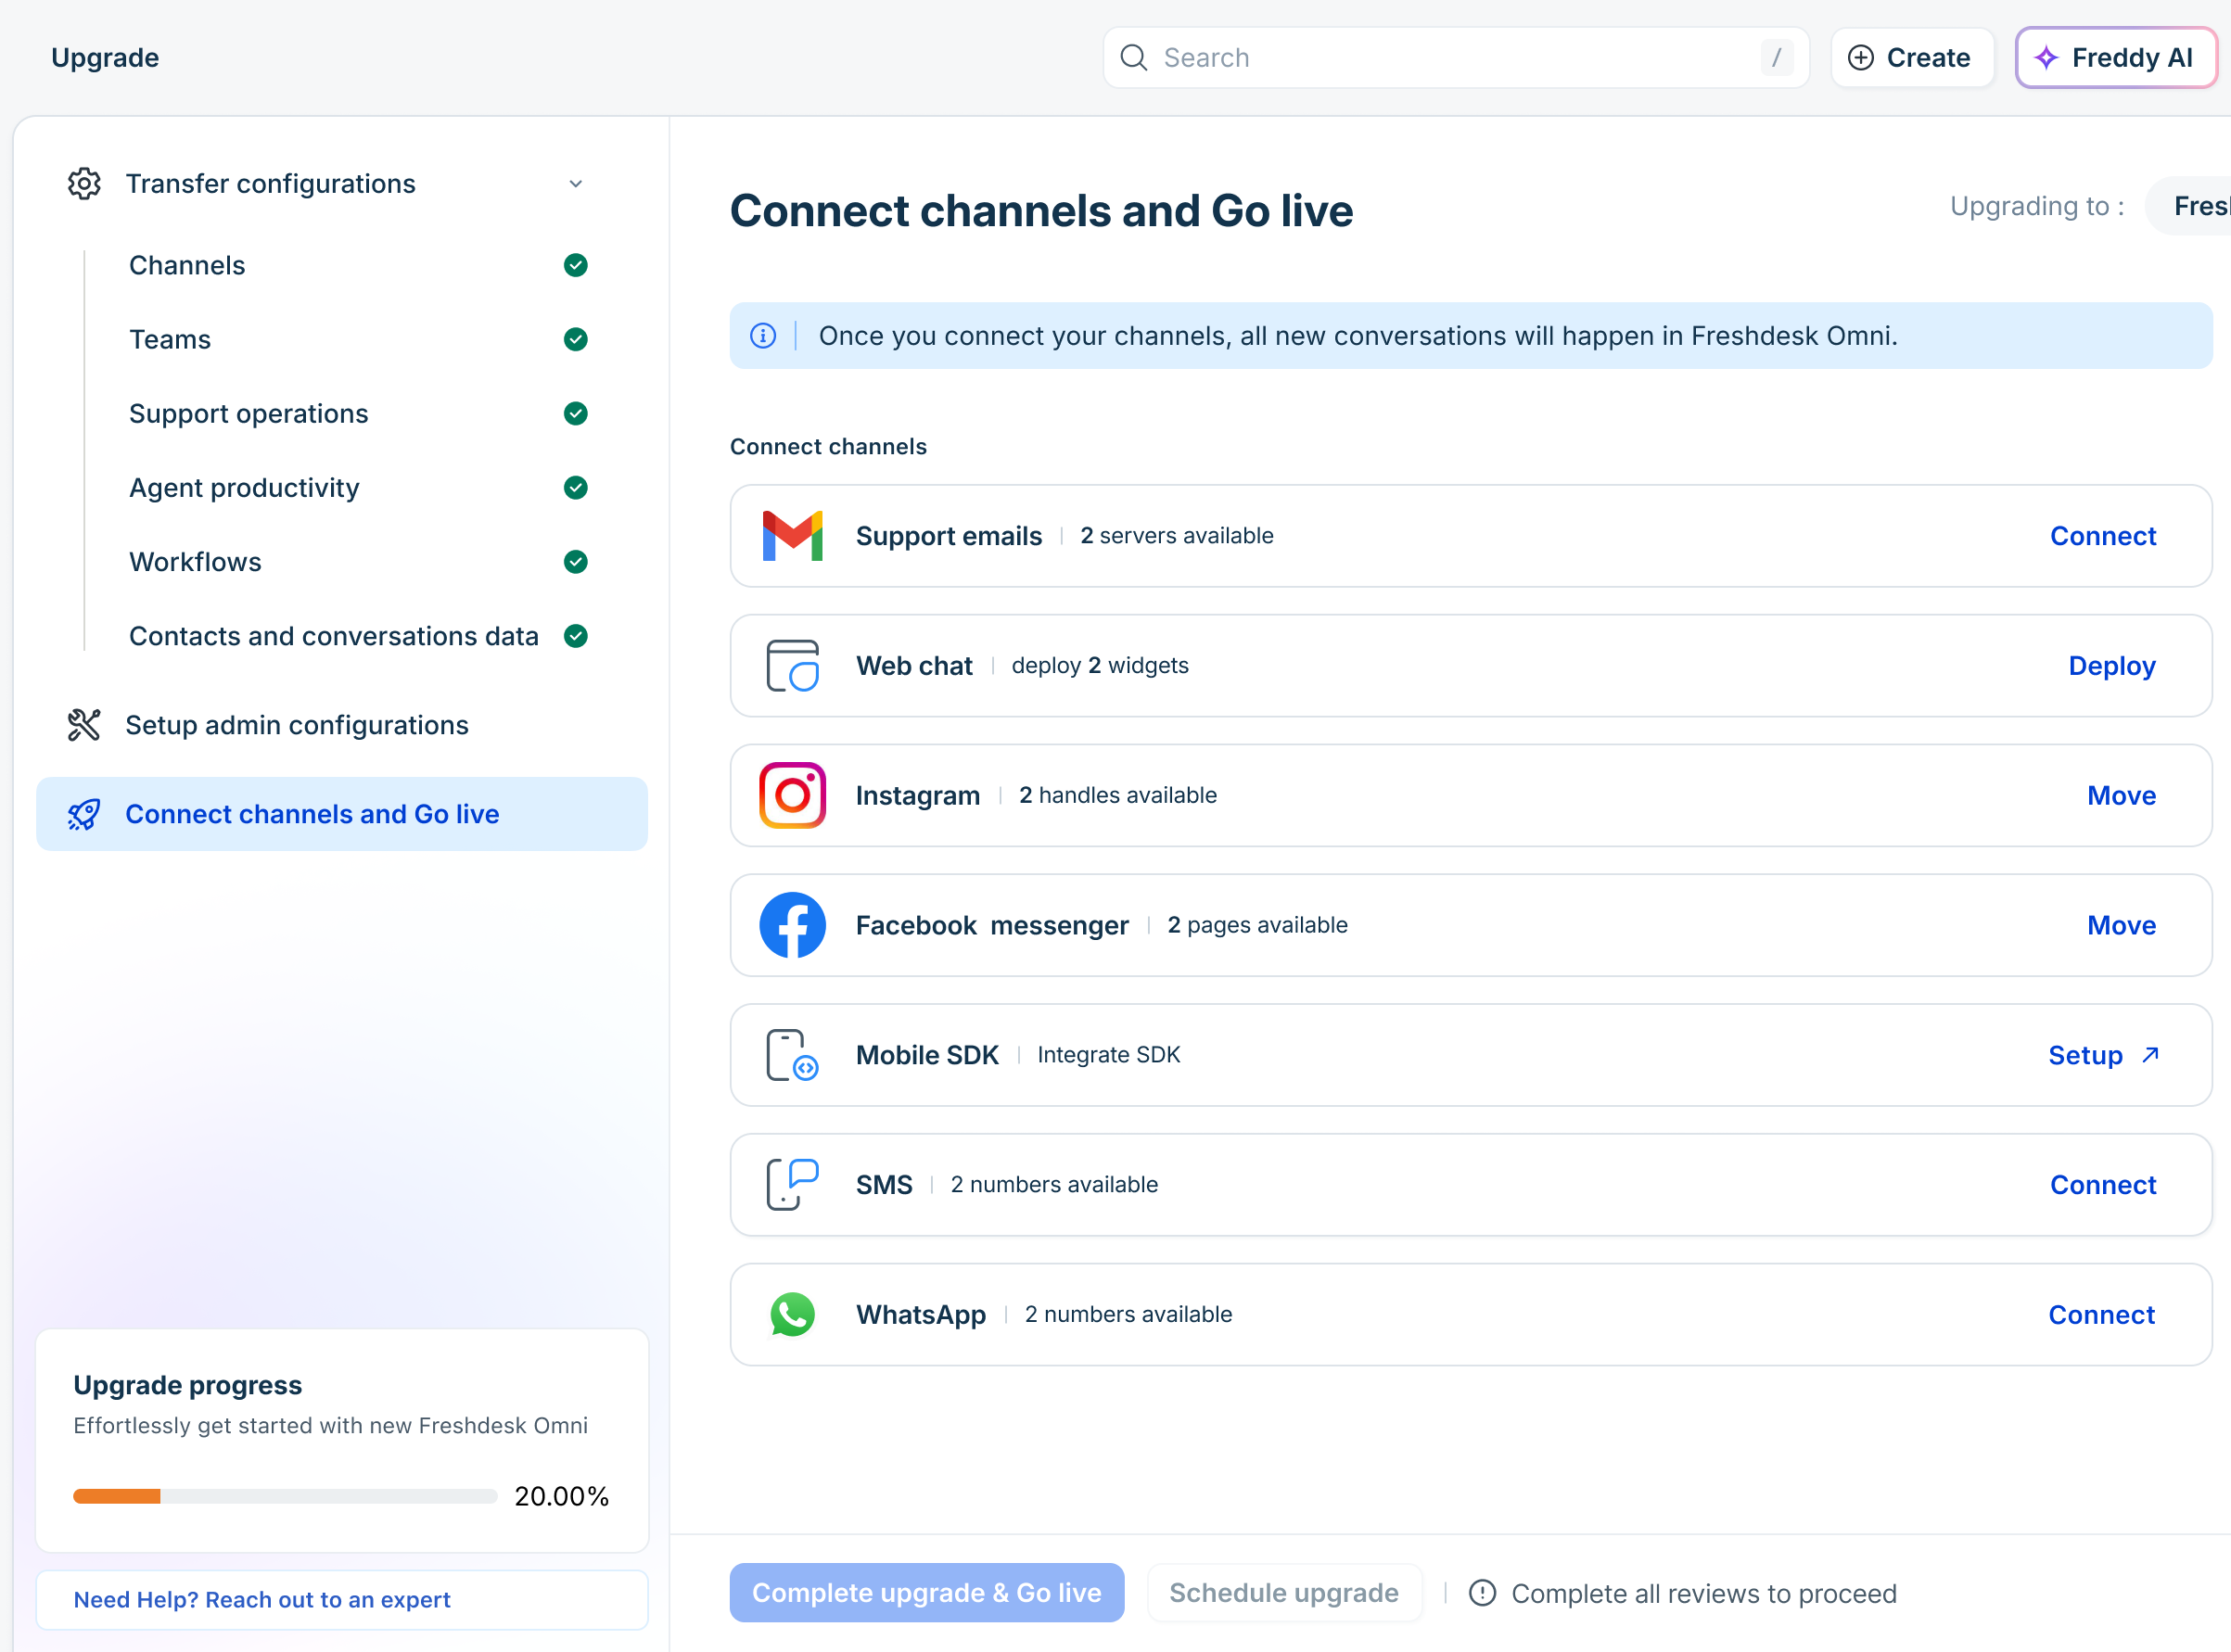
Important: The upgrade wizard shows only the channels transferred during Stage 1. After reconnecting related channel data, such as phone numbers, web chat widgets, or Facebook pages, the data will be removed from your previous account and will no longer receive customer messages there.
Reconnect support email
Reconnect the transferred email accounts from stage 1 to start receiving new email tickets in Freshdesk Omni 2025.
To reconnect transferred support emails:
- In the upgrade wizard, click Connect channels and go live.
- Click Connect next to Support emails.
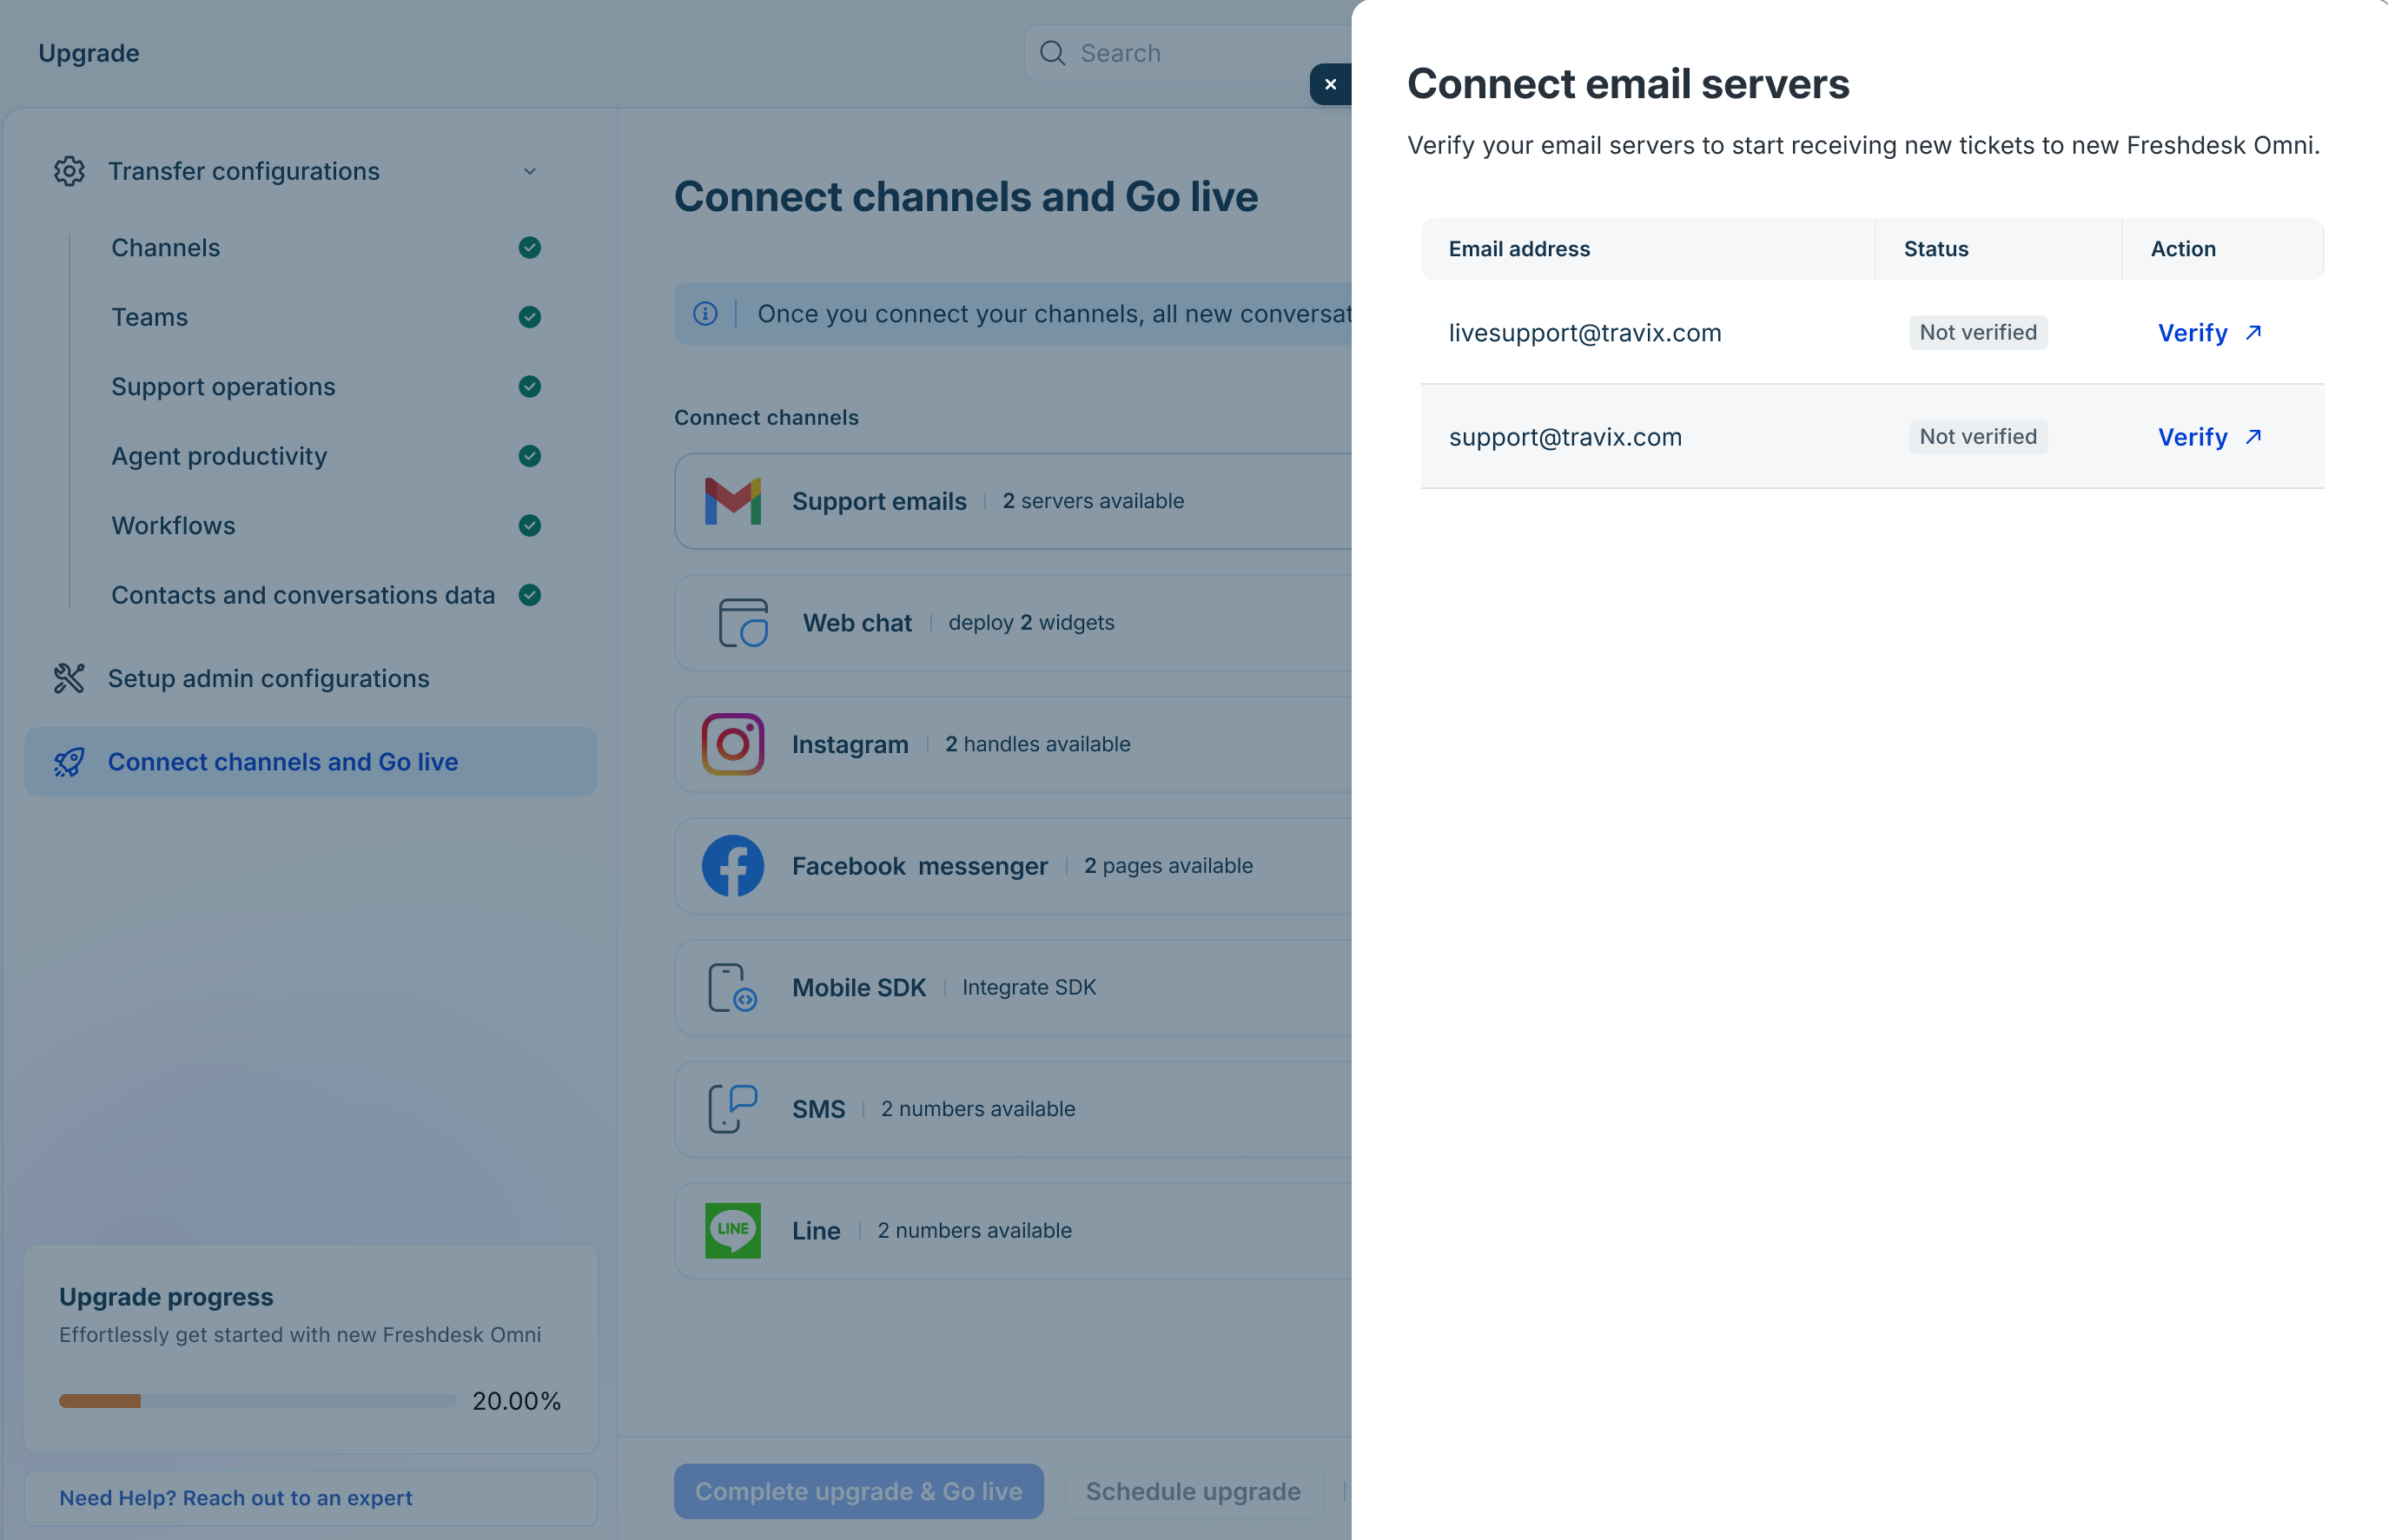
- Select the email accounts to verify and click Verify. You will be redirected to the Freshdesk Omni 2025 Email setup page.
- On the email configuration page, verify the mailbox settings and complete the required configuration. For details, see Set up your support email.
- Return to the Upgrade wizard.
- Verify that the email account status is updated to Verified.
- Repeat these steps for any remaining email accounts. Once completed, continue with the other channels.
Reconnect WhatsApp
Reconnect the transferred WhatsApp Business phone numbers from stage 1 so customer messages can be routed to Freshdesk Omni 2025 after the upgrade.
To reconnect a WhatsApp Business phone number:
- In the upgrade wizard, click Connect channels and go live.
- Click Connect next to WhatsApp.
- Select the phone numbers you want to connect and click Move. You will be redirected to the Freshdesk Omni WhatsApp page.
- On the WhatsApp configuration page, complete the required authorization and configuration. For details, see Connect your WhatsApp number with Freshdesk.
- Verify that the phone number status is updated to moved and the WhatsApp channel status changes to live in the upgrade wizard.
- Repeat these steps for any remaining phone numbers.
Deploy web chat widgets
Deploy the transferred web chat widgets to your website, portals, or other channels so new customer conversations are routed to Freshdesk Omni 2025.
To deploy a web chat widget:
- In the upgrade wizard, click Connect channels and go live.
- Click Deploy next to Webchat. For details, see Deploy widgets.
- Repeat these steps for any remaining widgets.
Reconnect Facebook
Reconnect the transferred Facebook pages from stage 1 to continue receiving customer conversations from Facebook Messenger.
To reconnect a Facebook page:
- In the upgrade wizard, click Connect channels and go live.
- Click Connect next to Facebook.
- On the Facebook configuration page, complete the required authorization and configuration.
- Return to the upgrade wizard.
- Verify that the page status is updated to moved and the Facebook channel status changes to live.
- Repeat these steps for any remaining Facebook pages.
Reconnect Instagram
Reconnect the transferred Instagram Business accounts from stage 1 to continue receiving customer conversations from Instagram.
To reconnect an Instagram Business account:
- In the upgrade wizard, click Connect channels and go live.
- Click Connect next to Instagram.
- On the Instagram configuration page, complete the required authorization and configuration.
- Return to the upgrade wizard.
- Verify that the page status is updated to moved and the Instagram channel status changes to live.
- Repeat these steps for any remaining accounts.
Reconnect SMS
Reconnect the transferred SMS phone numbers from stage 1 before receiving customer SMS messages in Freshdesk Omni 2025.
To reconnect an SMS phone number:
- In the upgrade wizard, click Connect channels and go live.
- Click Connect next to SMS.
- On the SMS configuration page, complete the required configuration.
- Return to the upgrade wizard.
- Verify that the phone number status is updated to moved and the SMS channel status changes to live.
- Repeat these steps for any remaining phone numbers.
Once you have reconnected all channels, proceed to the next step.
Review other configurations
Before completing the upgrade, review the configurations transferred during the upgrade to verify that they are configured as expected. The Review all configurations page provides a checklist of all transferred configurations, allowing you to review each section before proceeding with the final upgrade.
To review your configurations:
- In the upgrade wizard, click Connect channels and go live.
- Under Review all configurations, check the list of transferred configurations.
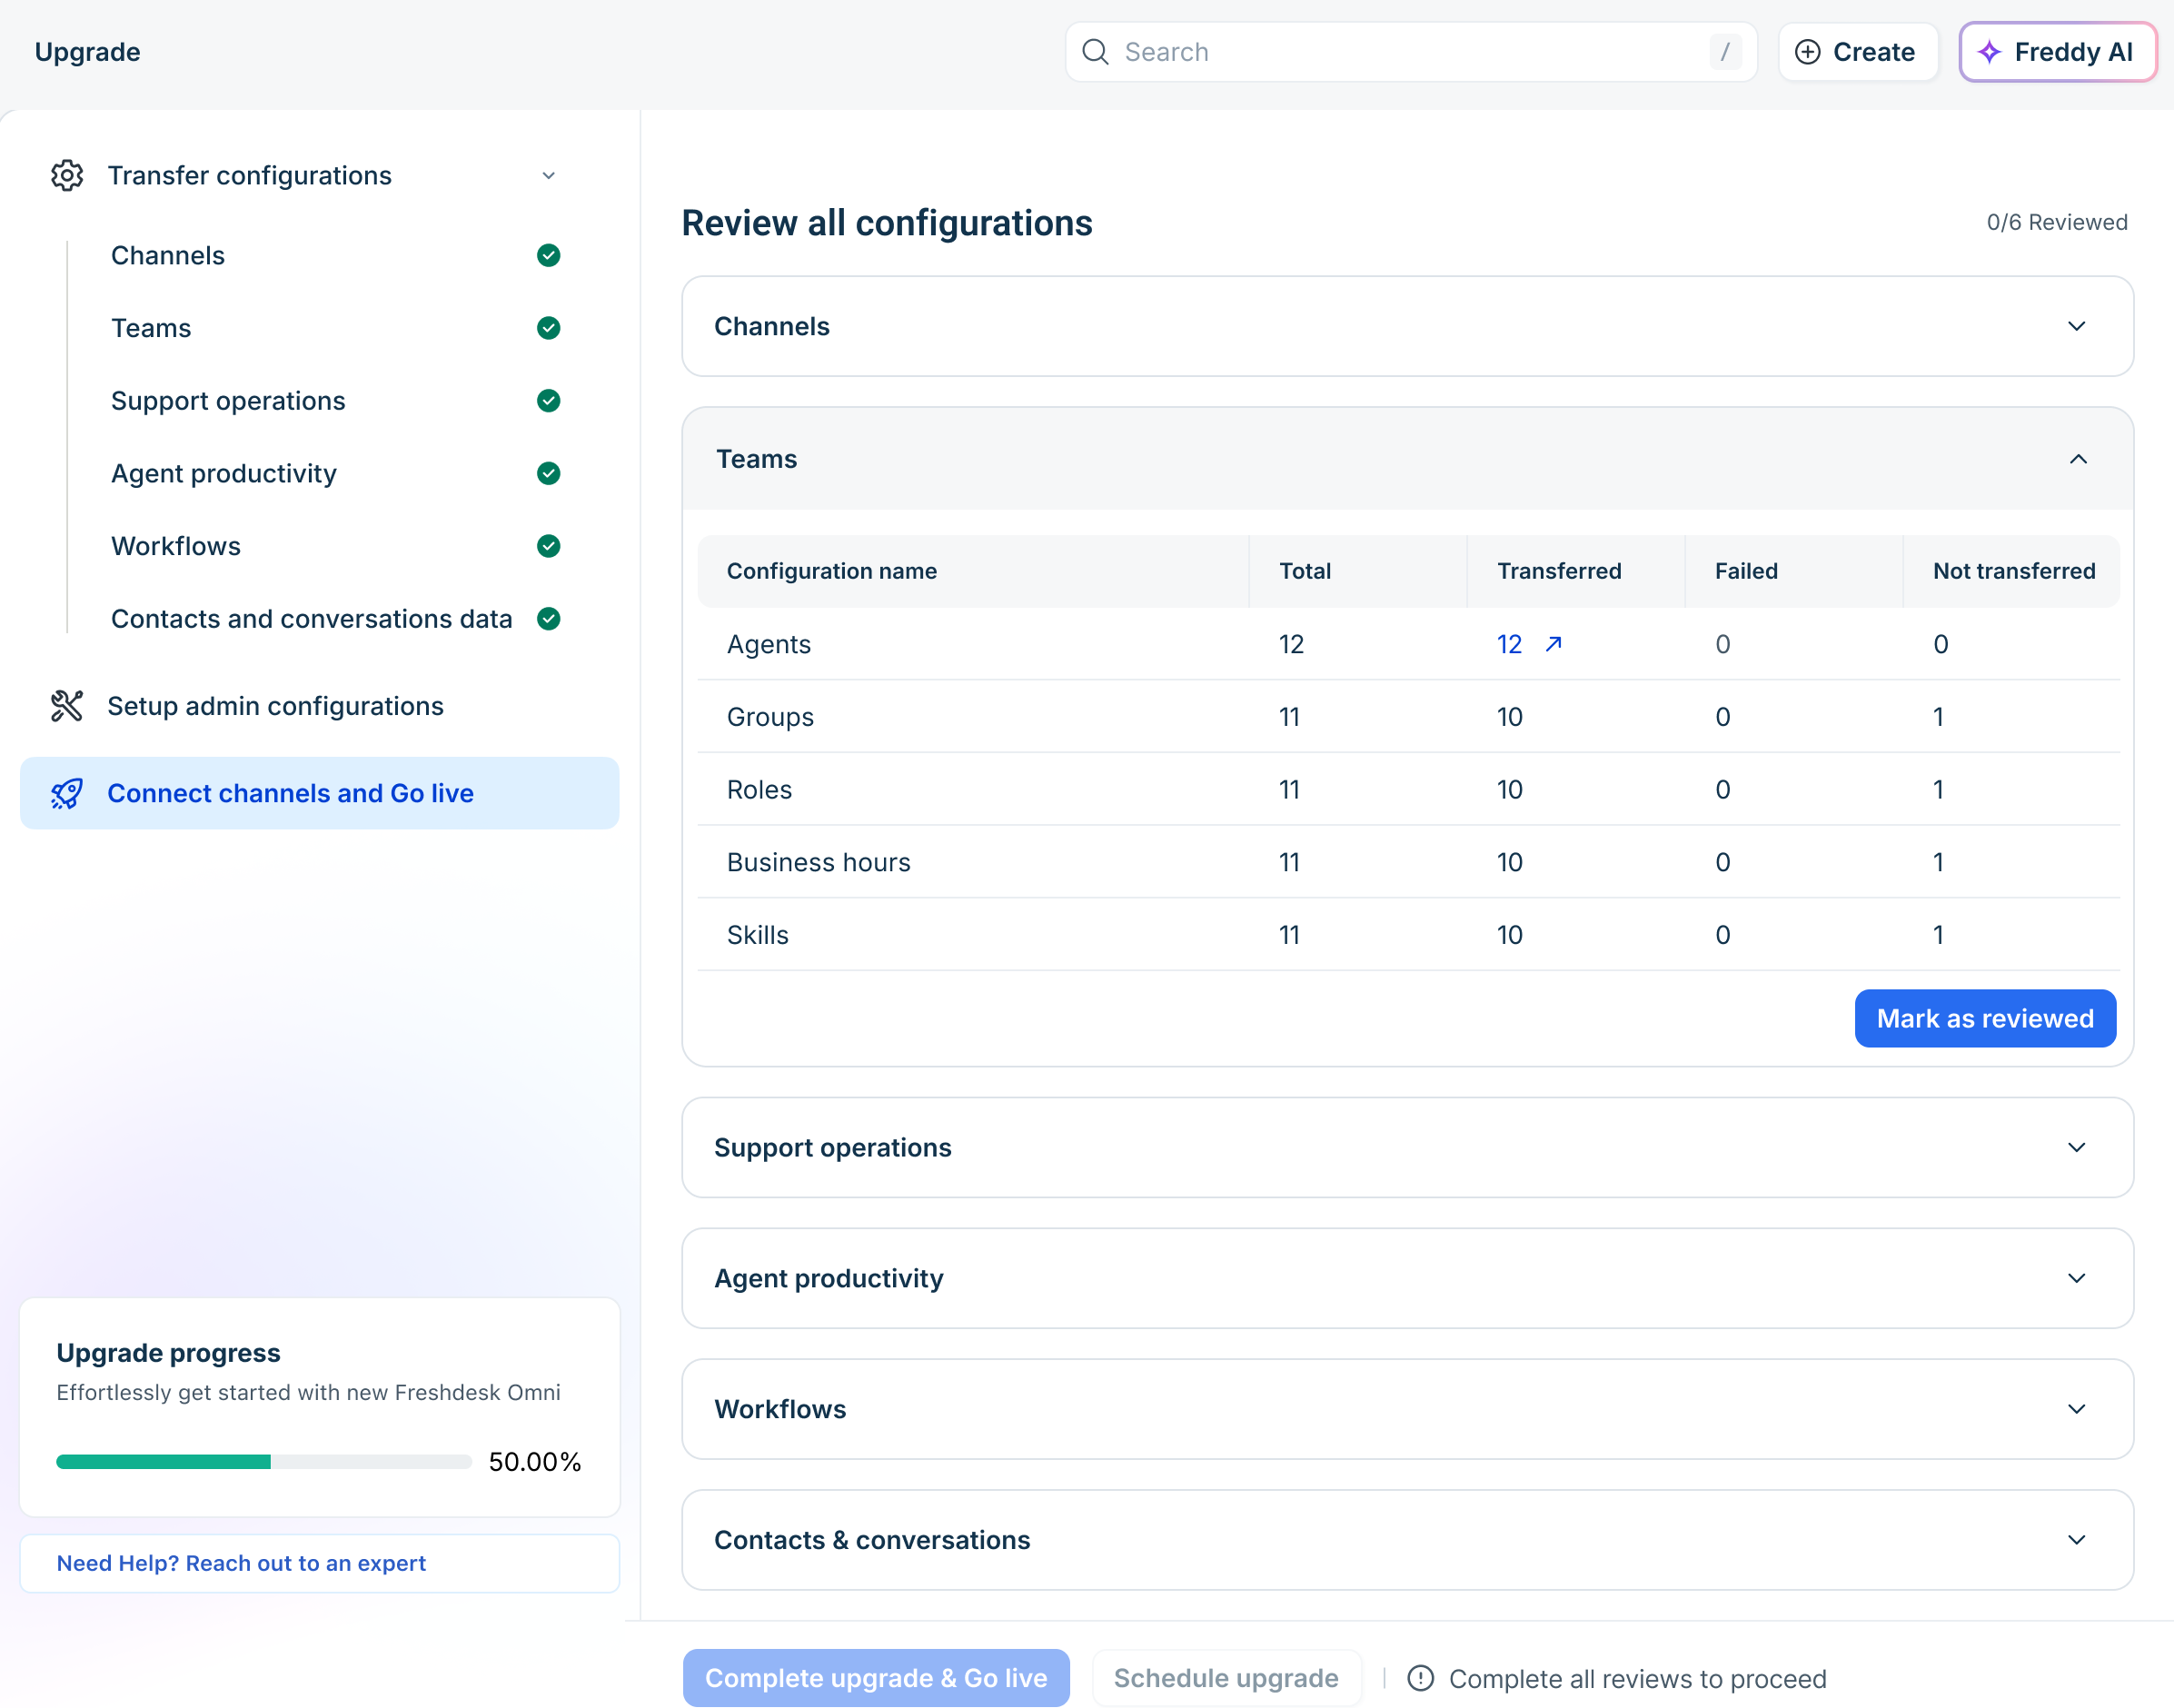
- Click each configuration to open the details and verify the settings.
- Once verified, click Mark as reviewed.
Repeat this for all configurations.
Complete upgrade and go live
After completing all required upgrade tasks, you can complete the final upgrade. You can either complete the upgrade immediately or schedule it for a later time.
Note: Only Account administrators can complete or schedule the final upgrade.
Upgrade now
To complete the upgrade immediately:
- In the upgrade wizard, click Connect channels and go live.
- After completing all the upgrade tasks, click Complete upgrade & go live.
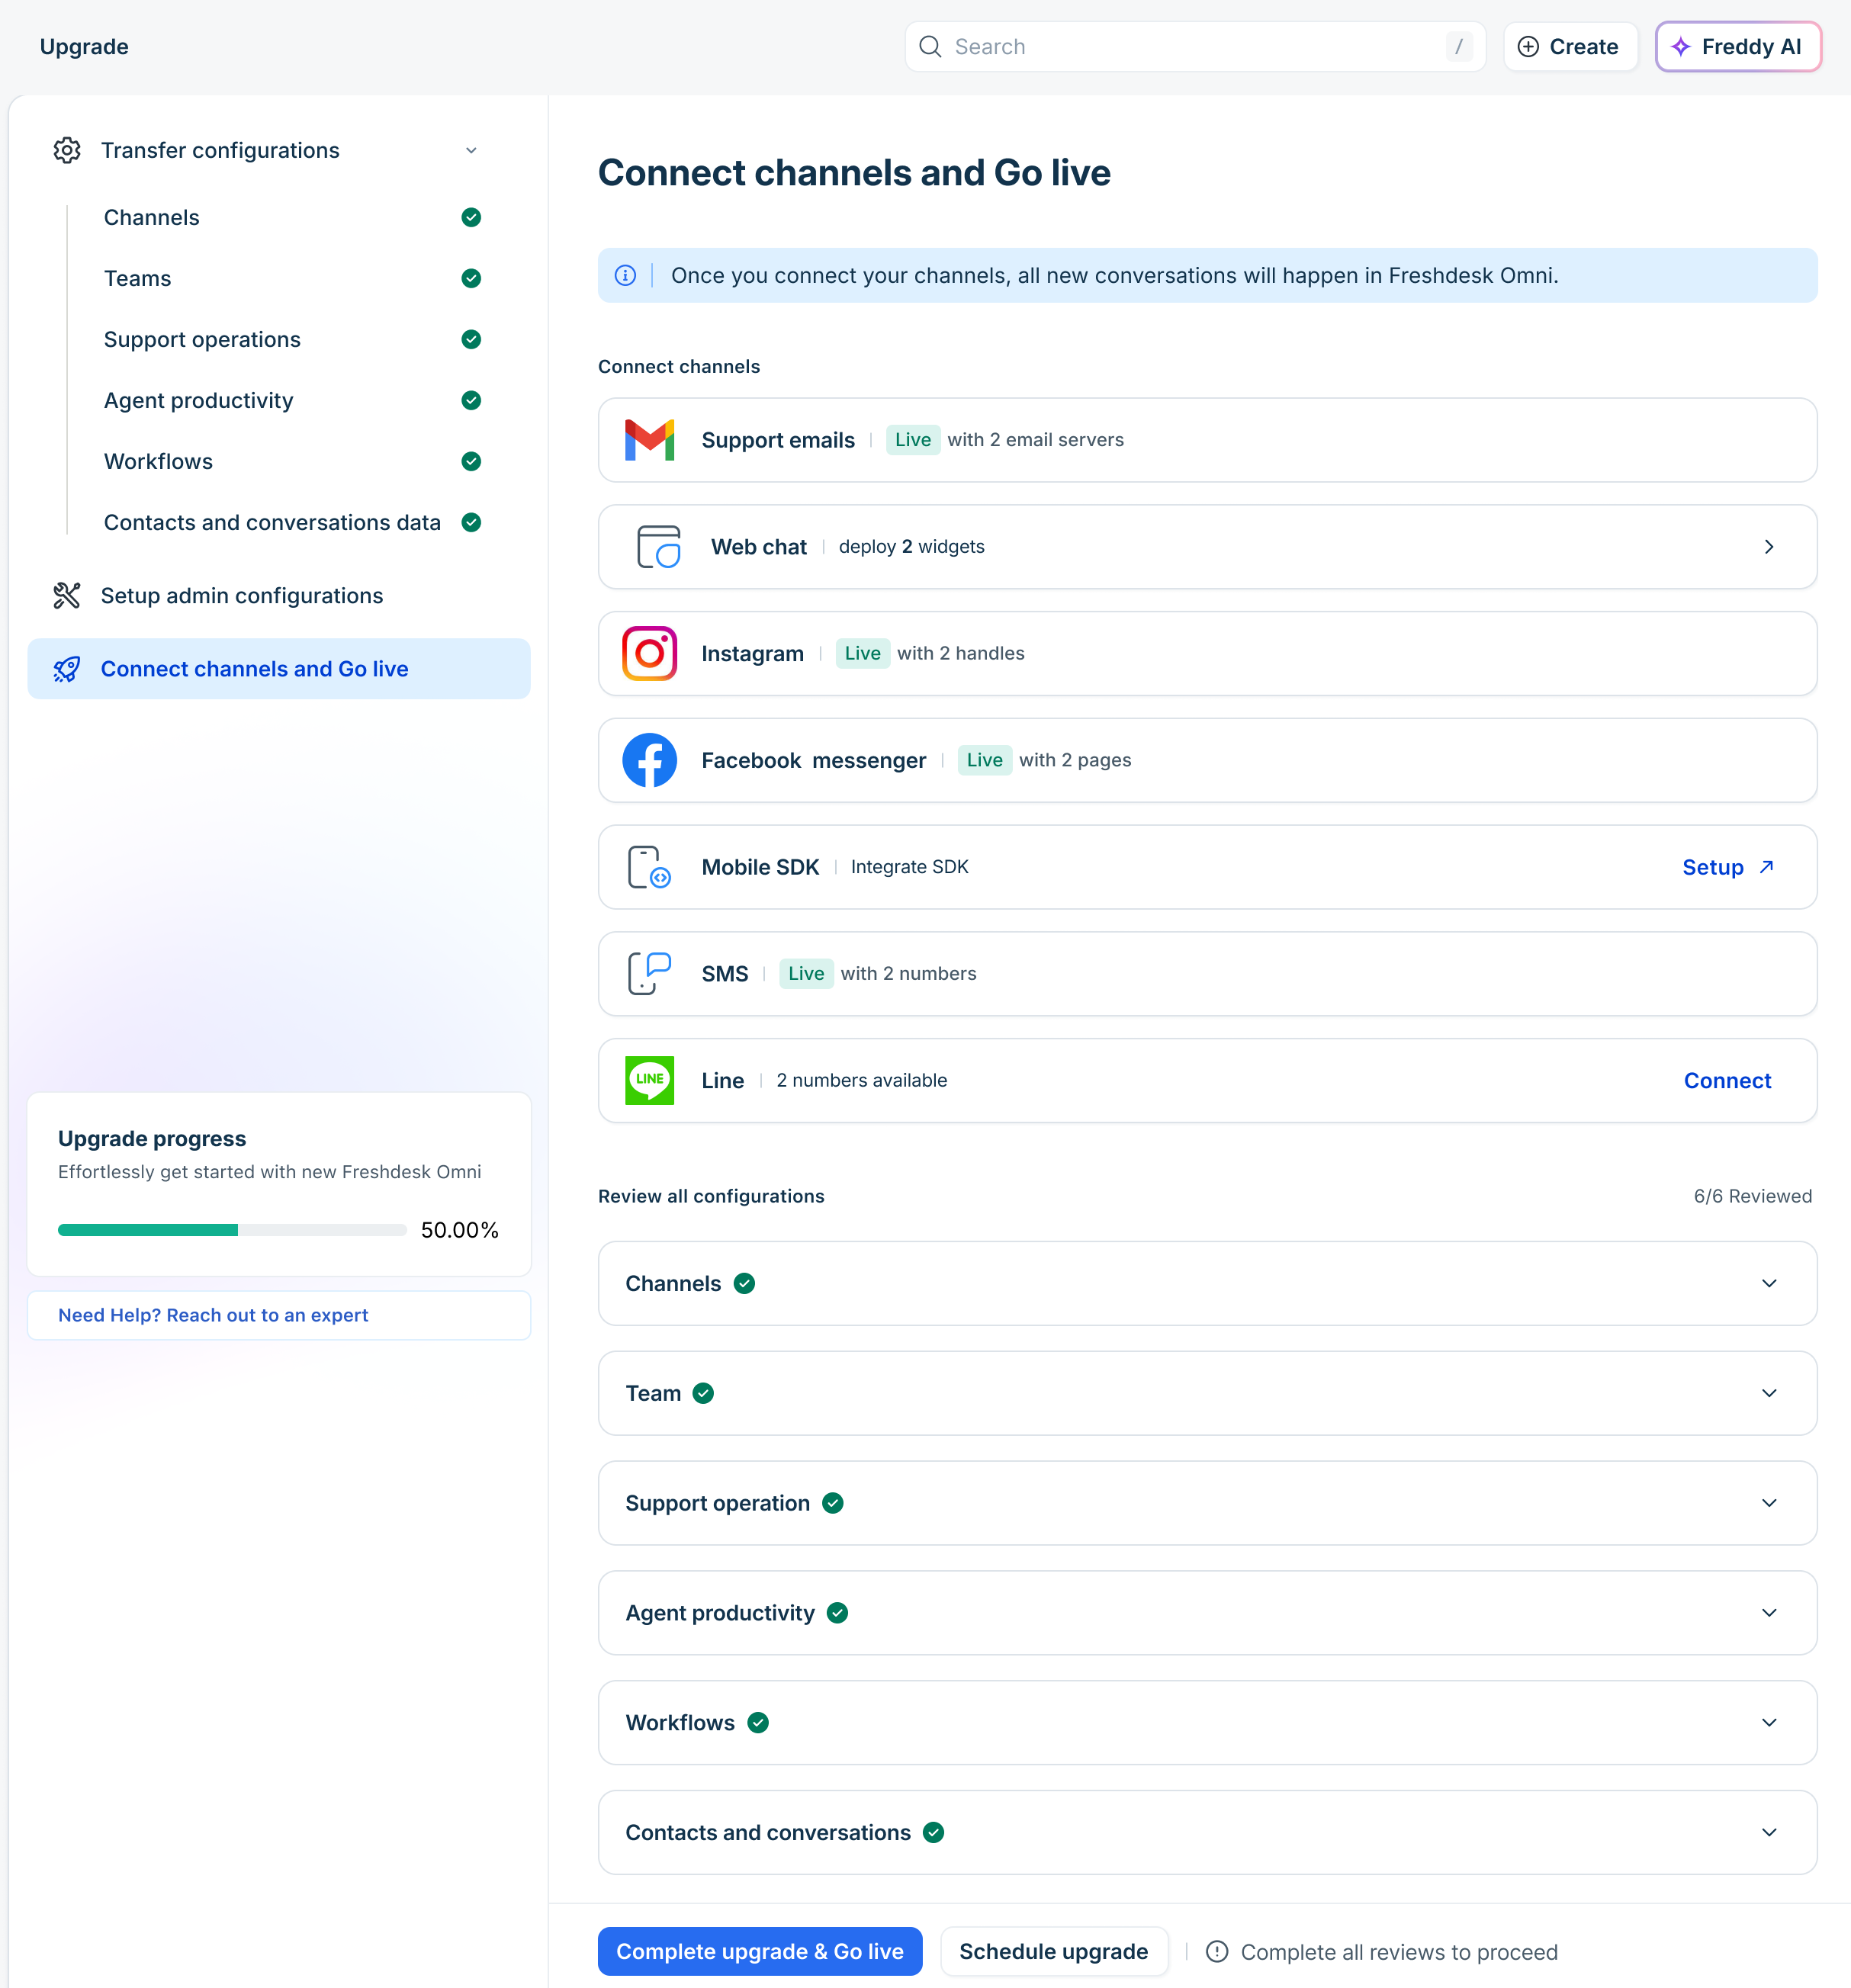
- You will see the upgrade progress window.
- Once the upgrade is complete, your account is migrated to Freshdesk Omni 2025.
Schedule the upgrade
If you prefer to complete the upgrade during a planned maintenance window, schedule the upgrade for a later date and time.
To schedule the upgrade:
- In the upgrade wizard, click Connect channels and go live.
- After completing all the upgrade tasks, click Schedule upgrade.
- Select the required date and time.
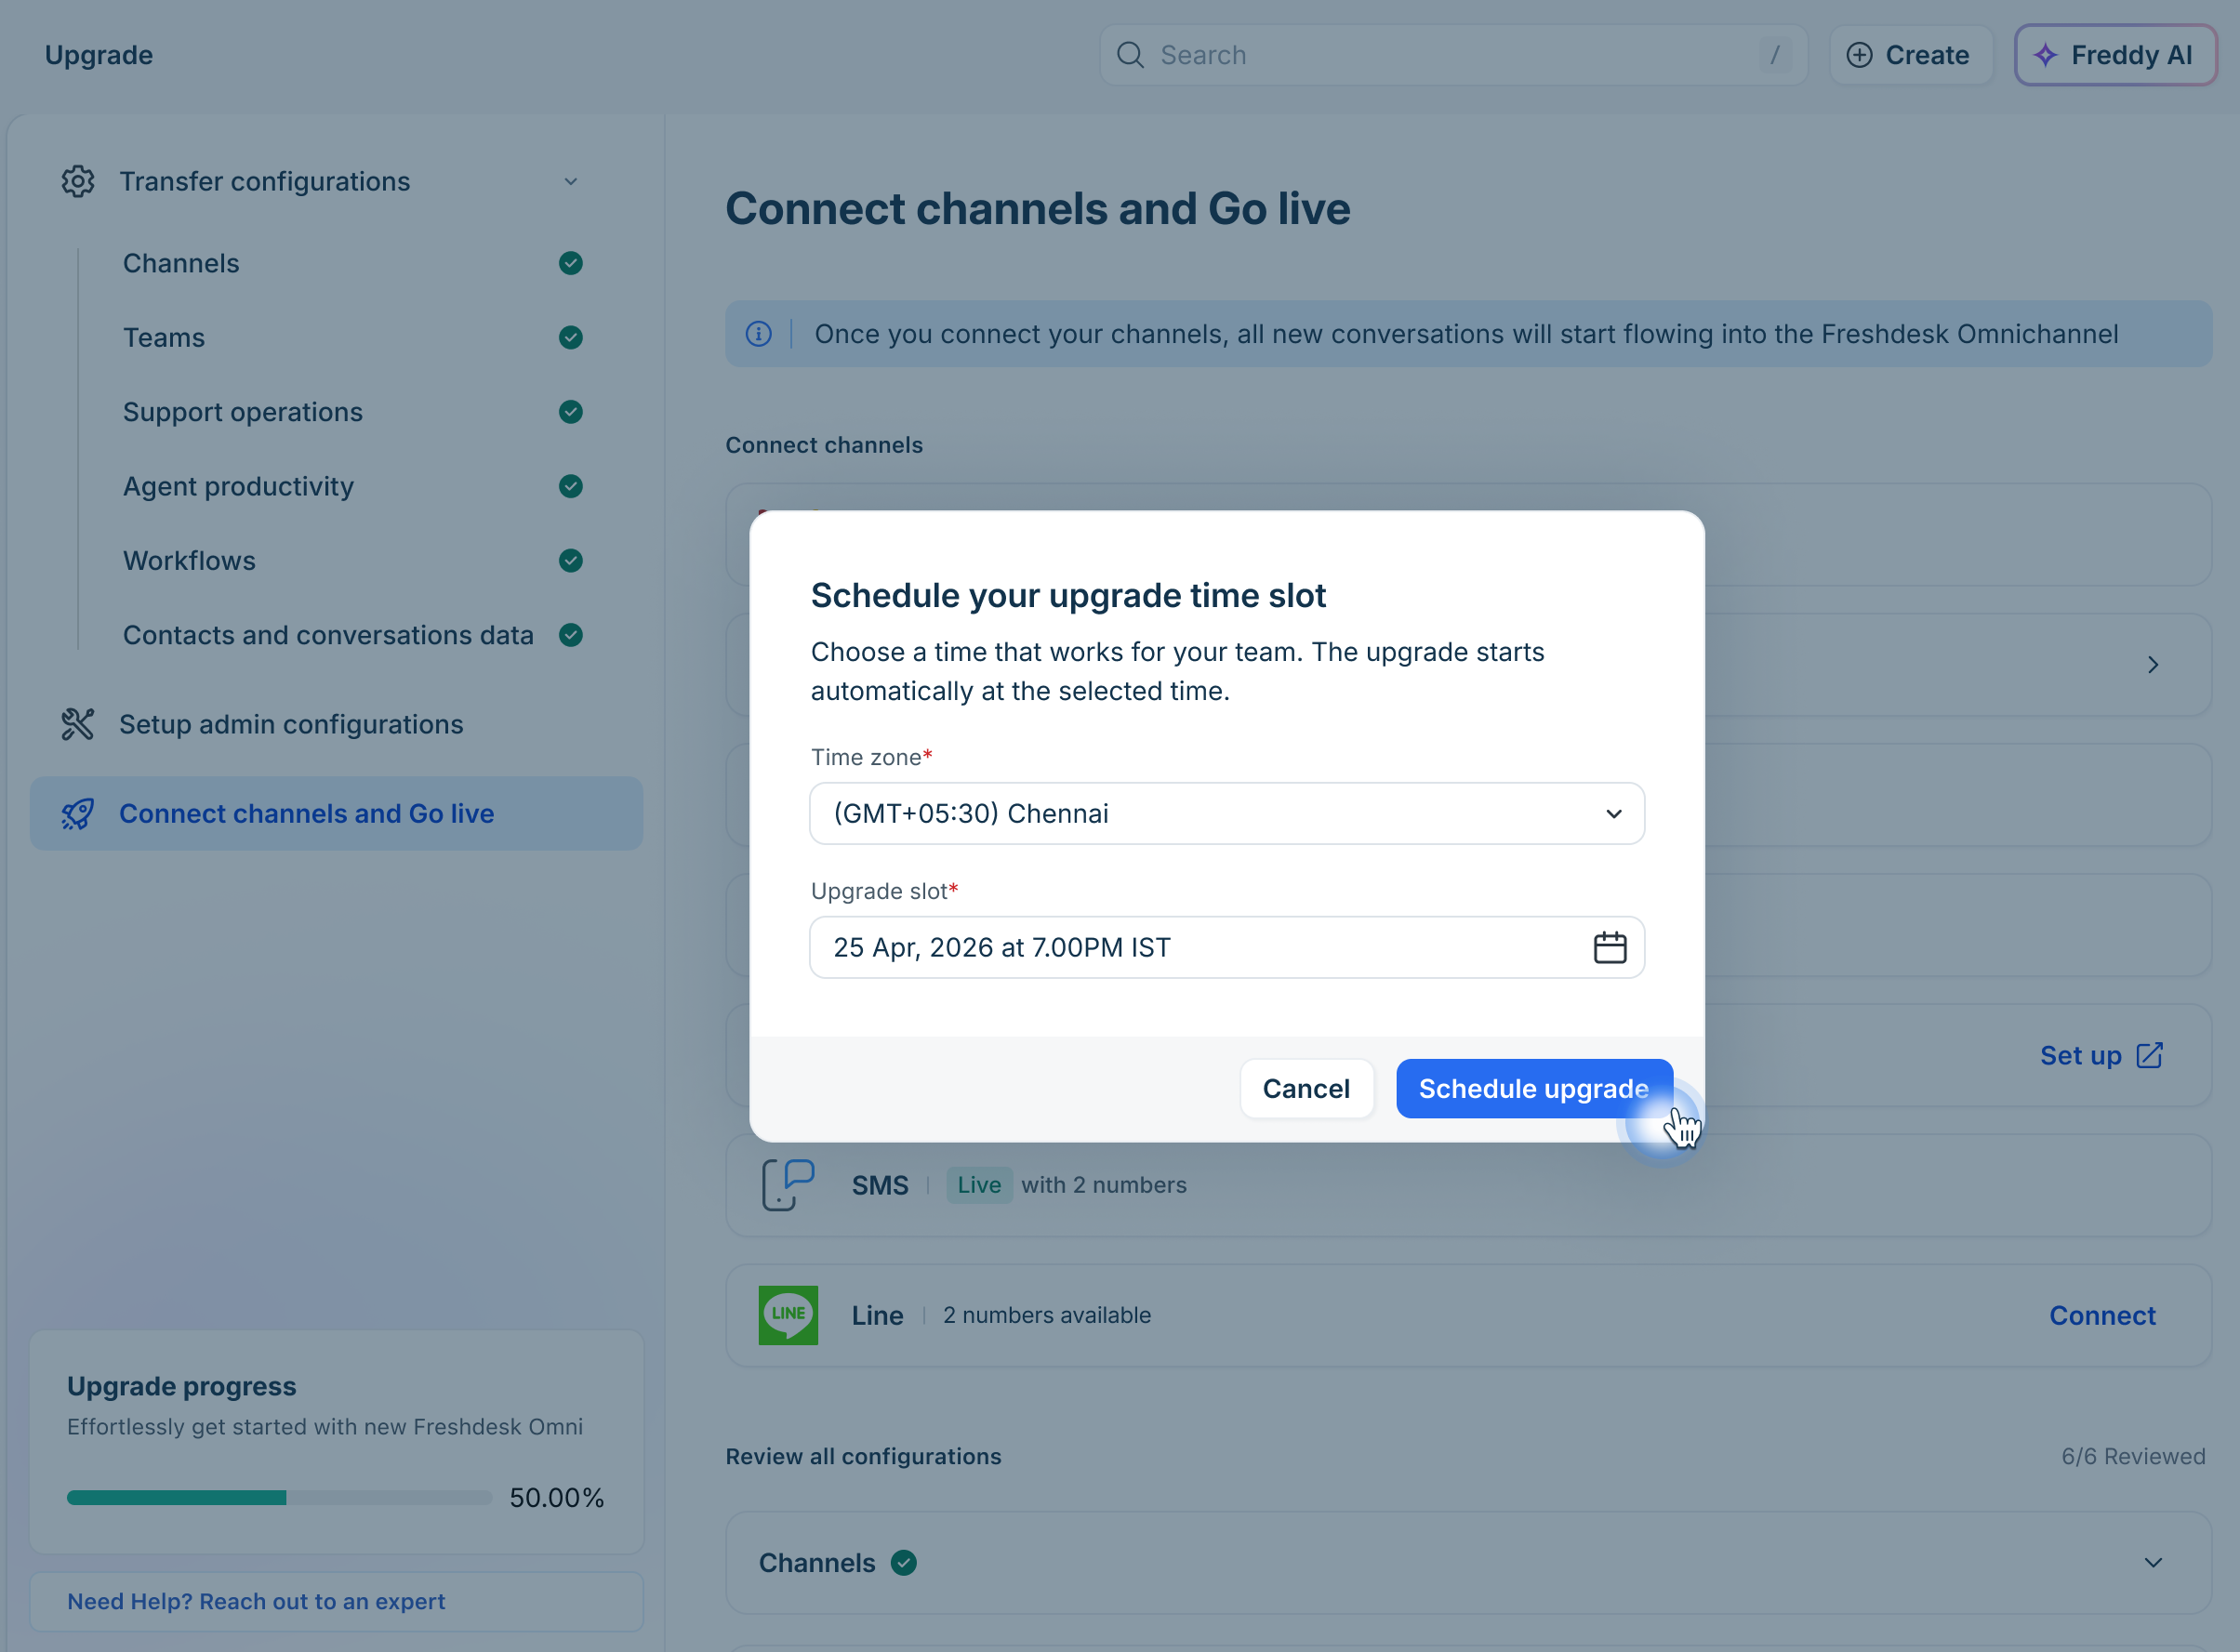
- Click Schedule upgrade.
- Once the upgrade is complete, your account is migrated to Freshdesk Omni 2025. You can always reschedule the upgrade later.
Next steps after the upgrade
Your account is now running on Freshdesk Omni 2025. Here are a few important changes and next steps to help you get started:
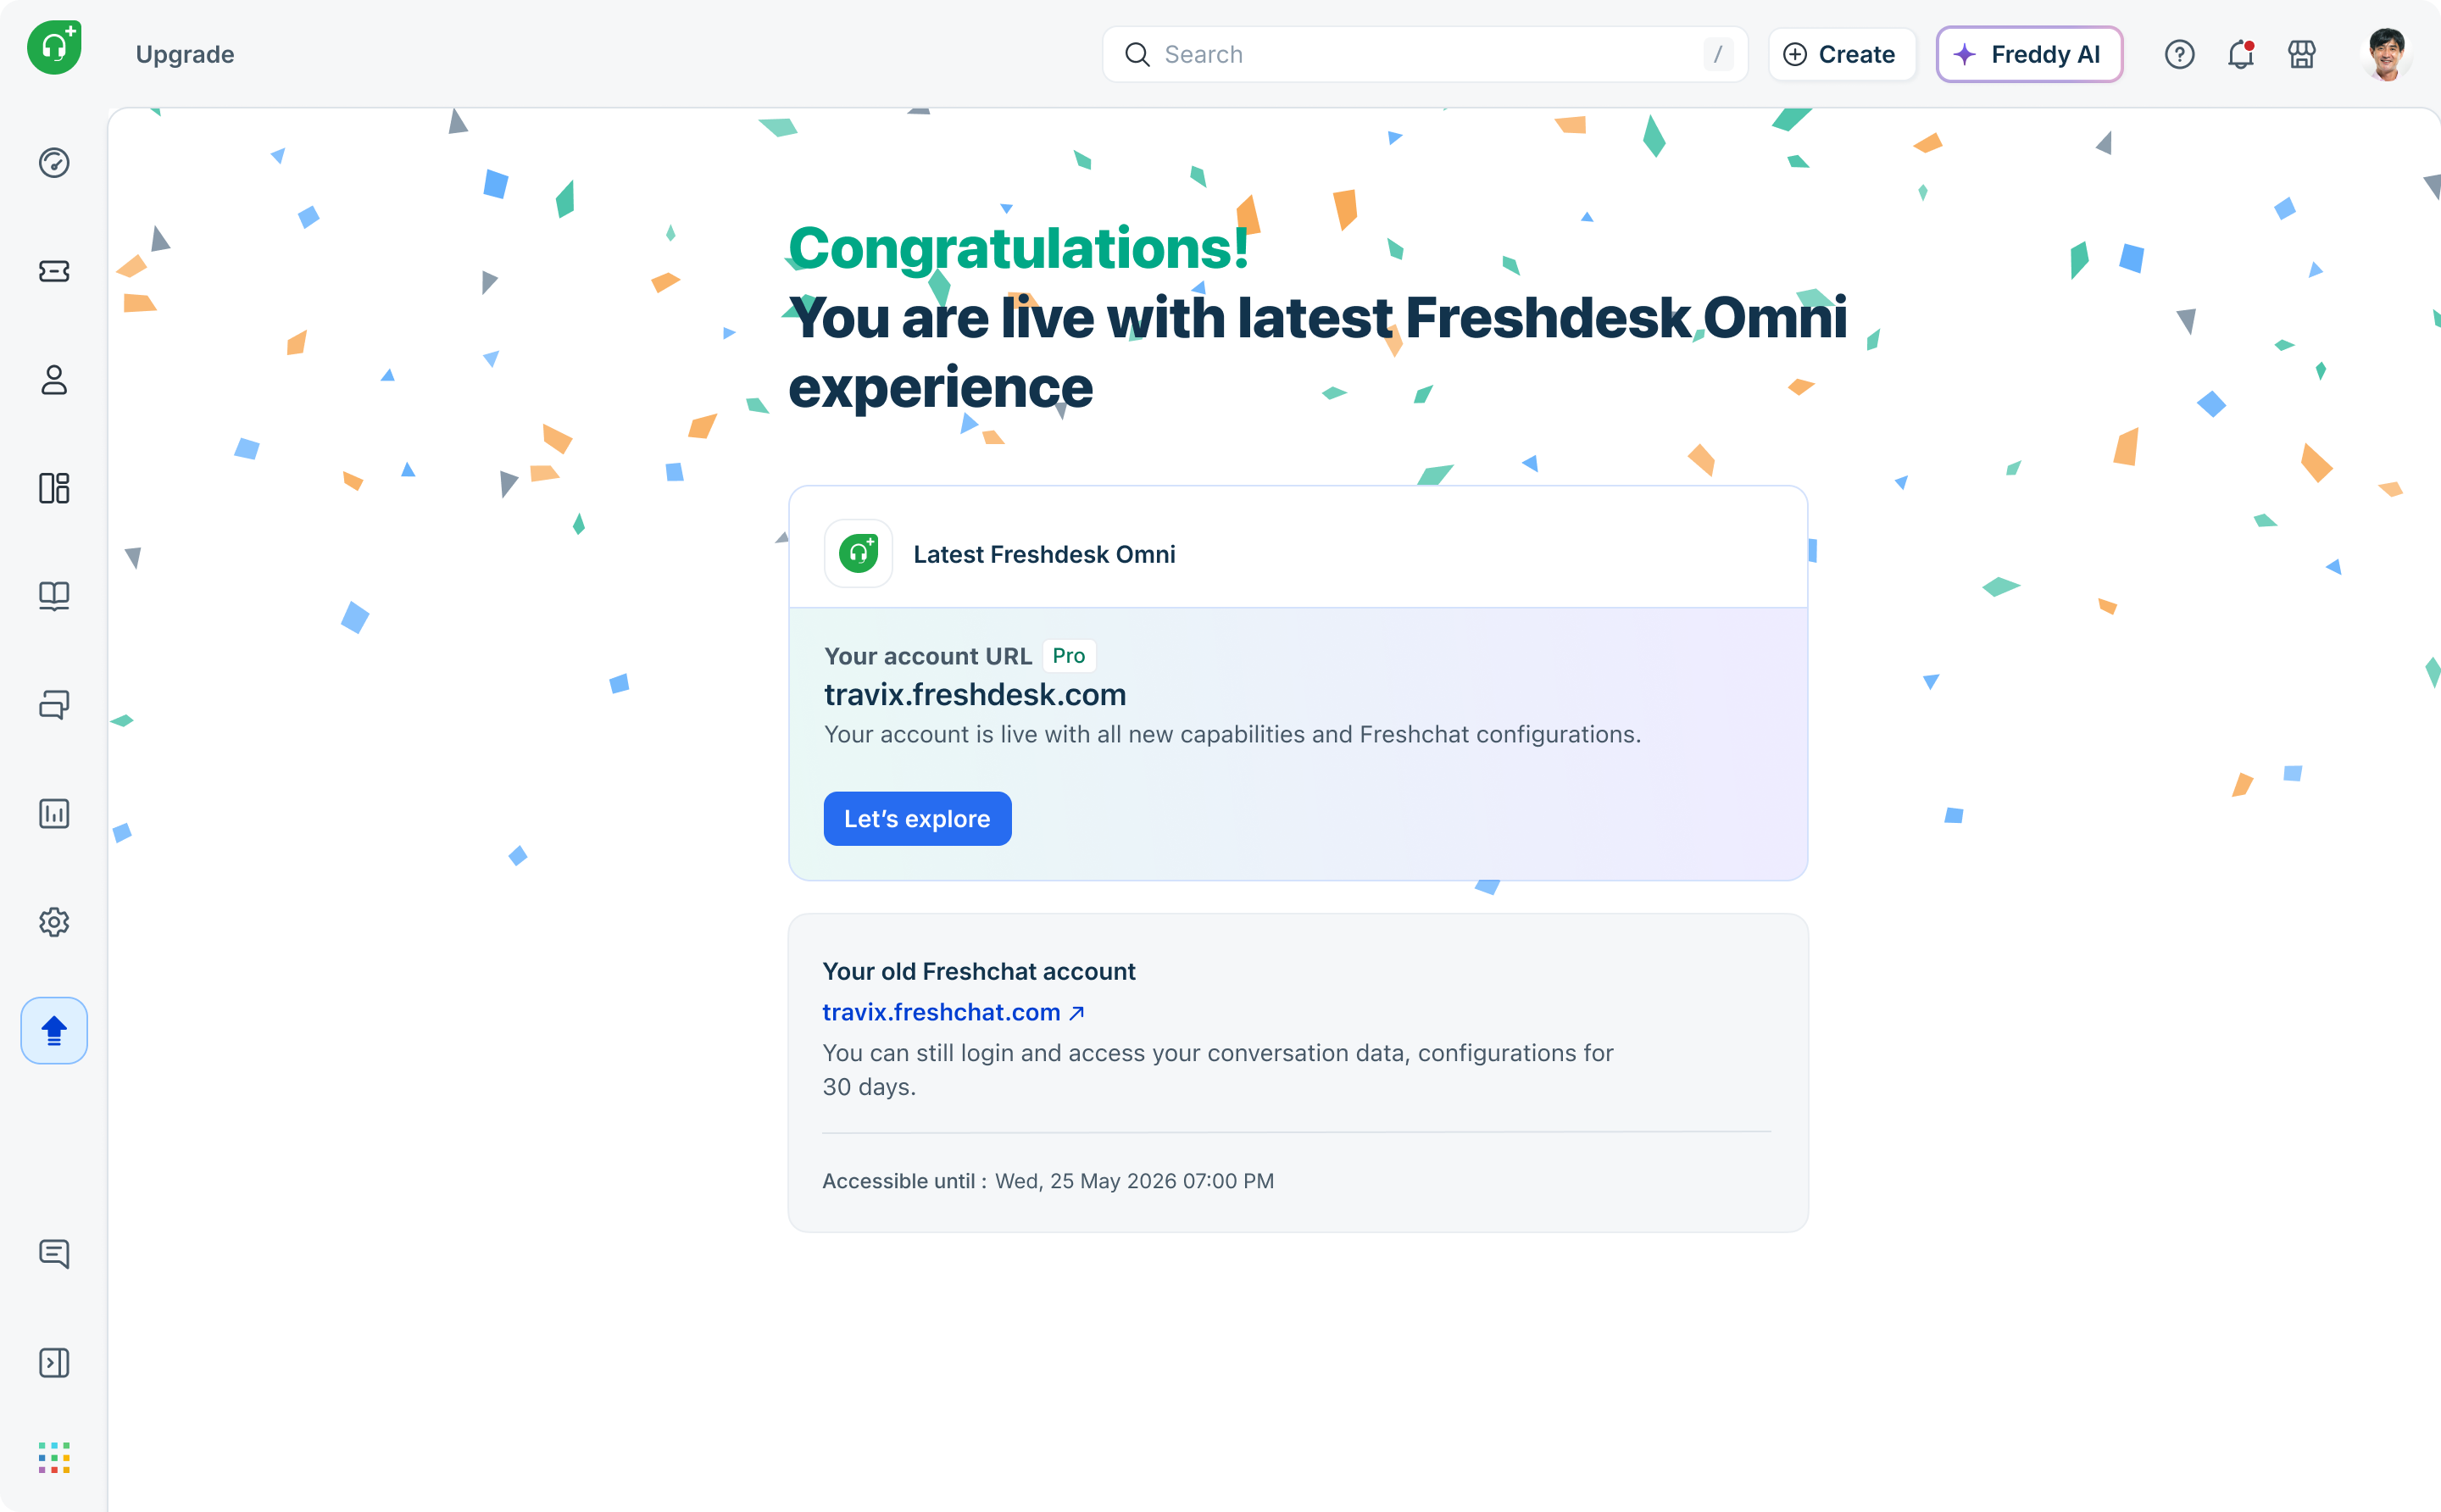
- Your account URL changes:
Access your account using the latest Freshdesk Omni URL. Update any bookmarks, integrations, webhooks, or internal documentation that reference your previous account URL.
Note: You can continue to access your existing Freshchat account in trial mode for 30 days after the upgrade. The account URL is displayed in the upgrade wizard. - Your subscription is updated:
Your account will be moved to the appropriate Freshdesk Omni 2025 plan based on your current subscription. To review your plan details and billing information, go to Admin > Billing. - New conversations are routed to Freshdesk Omni 2025:
All customer conversations from your reconnected channels will now be received and managed in Freshdesk Omni 2025. Verify that each channel is receiving conversations as expected. - Start using Freshdesk Omni 2025:
Your administrators can now begin using the unified workspace, where customer conversations from all connected channels are managed as tickets. For details see, Getting Started with Freshdesk Omni