This article explains how to analyze the live customer queries that a chatbot receives and use them to improve natural language detection. The Retrain Natural Language page collects these queries so that you can map them to intents and questions, confirm accurate matches, and revise responses that customers marked as unhelpful.
TABLE OF CONTENTS
- Prerequisites
- Overview of retrain natural language
- Review unanswered queries
- Review answered queries
- Improve unhelpful responses
- Create and manage Q&As
- Train the chatbot to apply your changes
- Unlock new AI-powered possibilities
Prerequisites
Before you retrain natural language, ensure the following requirements are met:
- Ensure you have admin access to AI Agent Studio in your Freshdesk Omni account.
- Ensure you have a chatbot that has received customer conversations. The retrain page populates from live traffic, so a chatbot with no conversations shows zero queries on every tab.
- Ensure you have enabled natural language detection for the chatbot. See configure natural language settings for chatbots.
- Ensure you understand how intents and utterances map to flows. See intent detection for chatbots.
Overview of retrain natural language
Retraining is a continuous improvement cycle rather than a one-time setup task. The chatbot records the free-text messages it receives, the retrain page presents them for review, and the utterances you map from those messages become training data for later conversations.
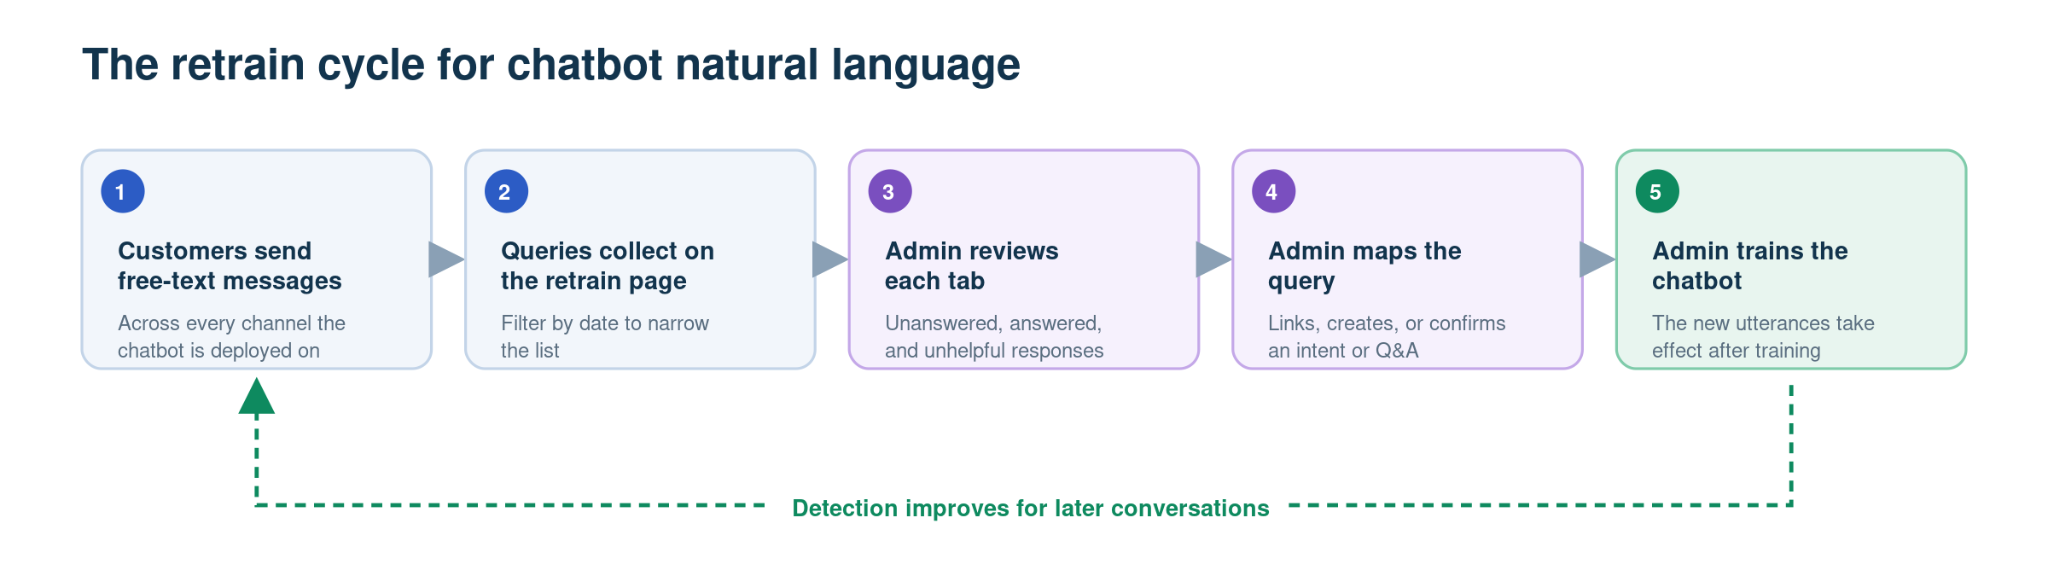
The retrain page belongs to a single chatbot and a single channel. The chatbot header shows which chatbot and channel you are working in, along with the current version and its state, such as Draft or Published.
Open the retrain page
The retrain page is located within the Train section of the Natural Language tab, next to Q&A.
To open the retrain page:
- Go to AI Agent Studio > Chatbots and select the required chatbot.
- Go to the Natural Language tab.
- Select Train.
- Select Retrain Natural Language.
Choose a tab
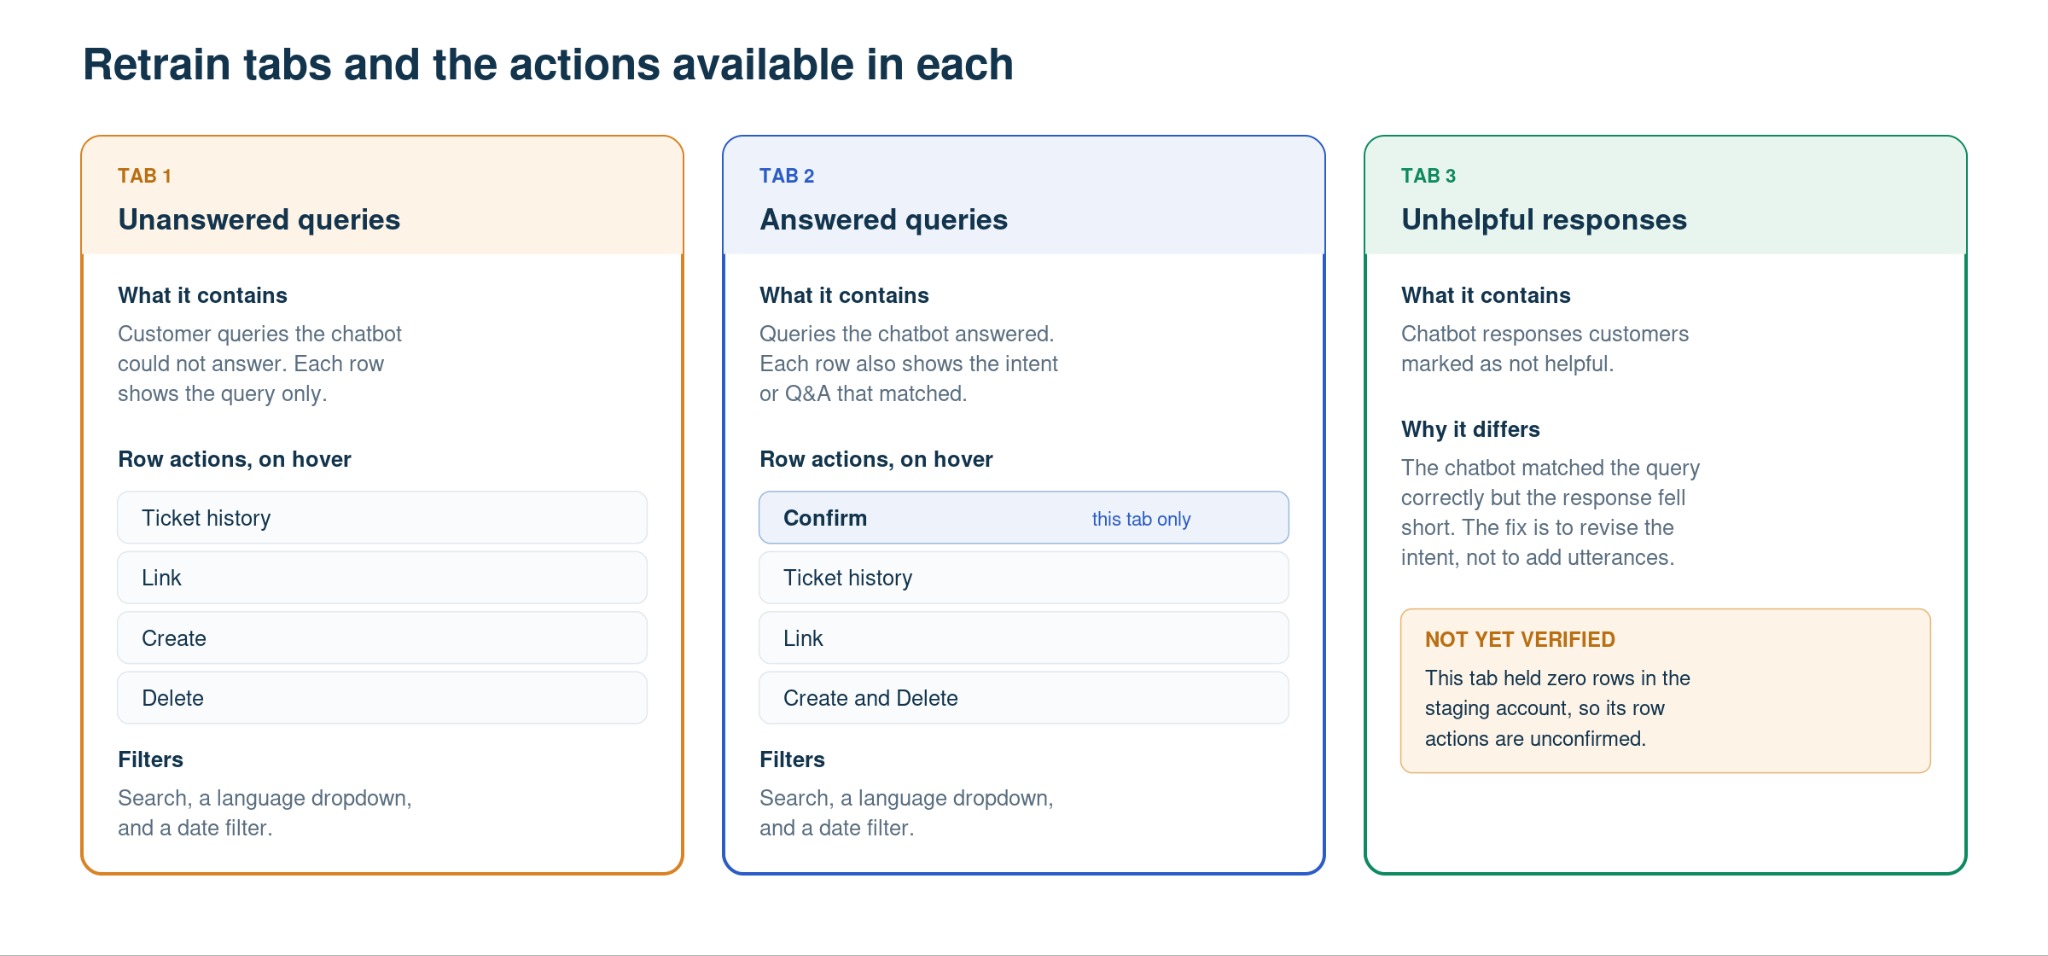
The retrain page organizes traffic into three tabs, and each tab displays a count of the queries it currently holds. Each tab answers a different question about chatbot performance:
- Unanswered queries — Contains customer queries that the chatbot could not answer. Use this tab to find gaps in coverage.
- Answered queries — Contains customer queries that the chatbot answered, along with the intent or question that matched. Use this tab to verify accuracy.
- Unhelpful responses — Contains chatbot responses that customers marked as not helpful. Use this tab to revise an intent that matched correctly but answered poorly.
The actions available differ by tab.
Act on one query or several
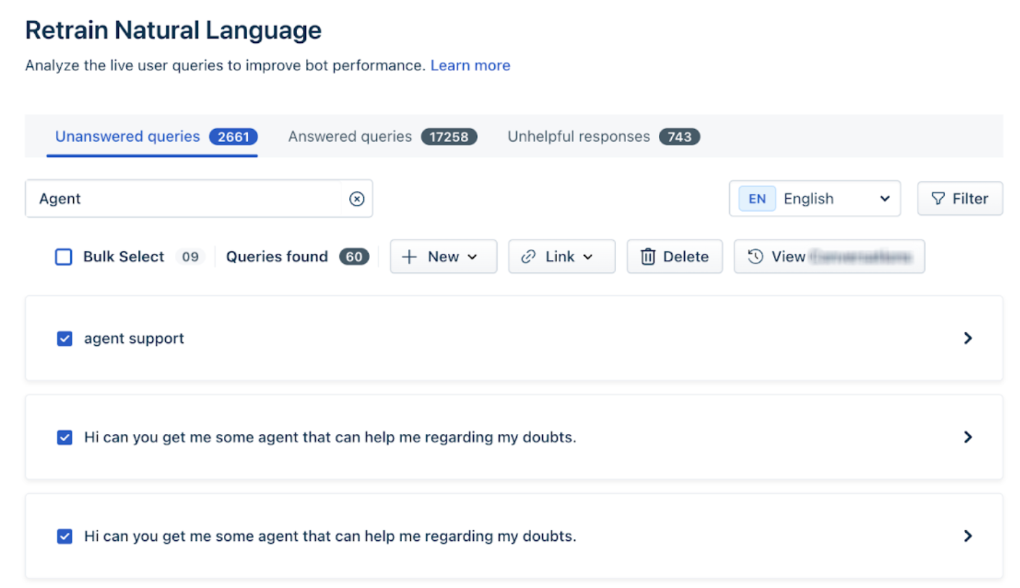
Every tab offers two layers of action. Pointing at a single row reveals a set of icons at the right of that row. Selecting a row's checkbox replaces those icons with a toolbar that applies one action to every selected query.
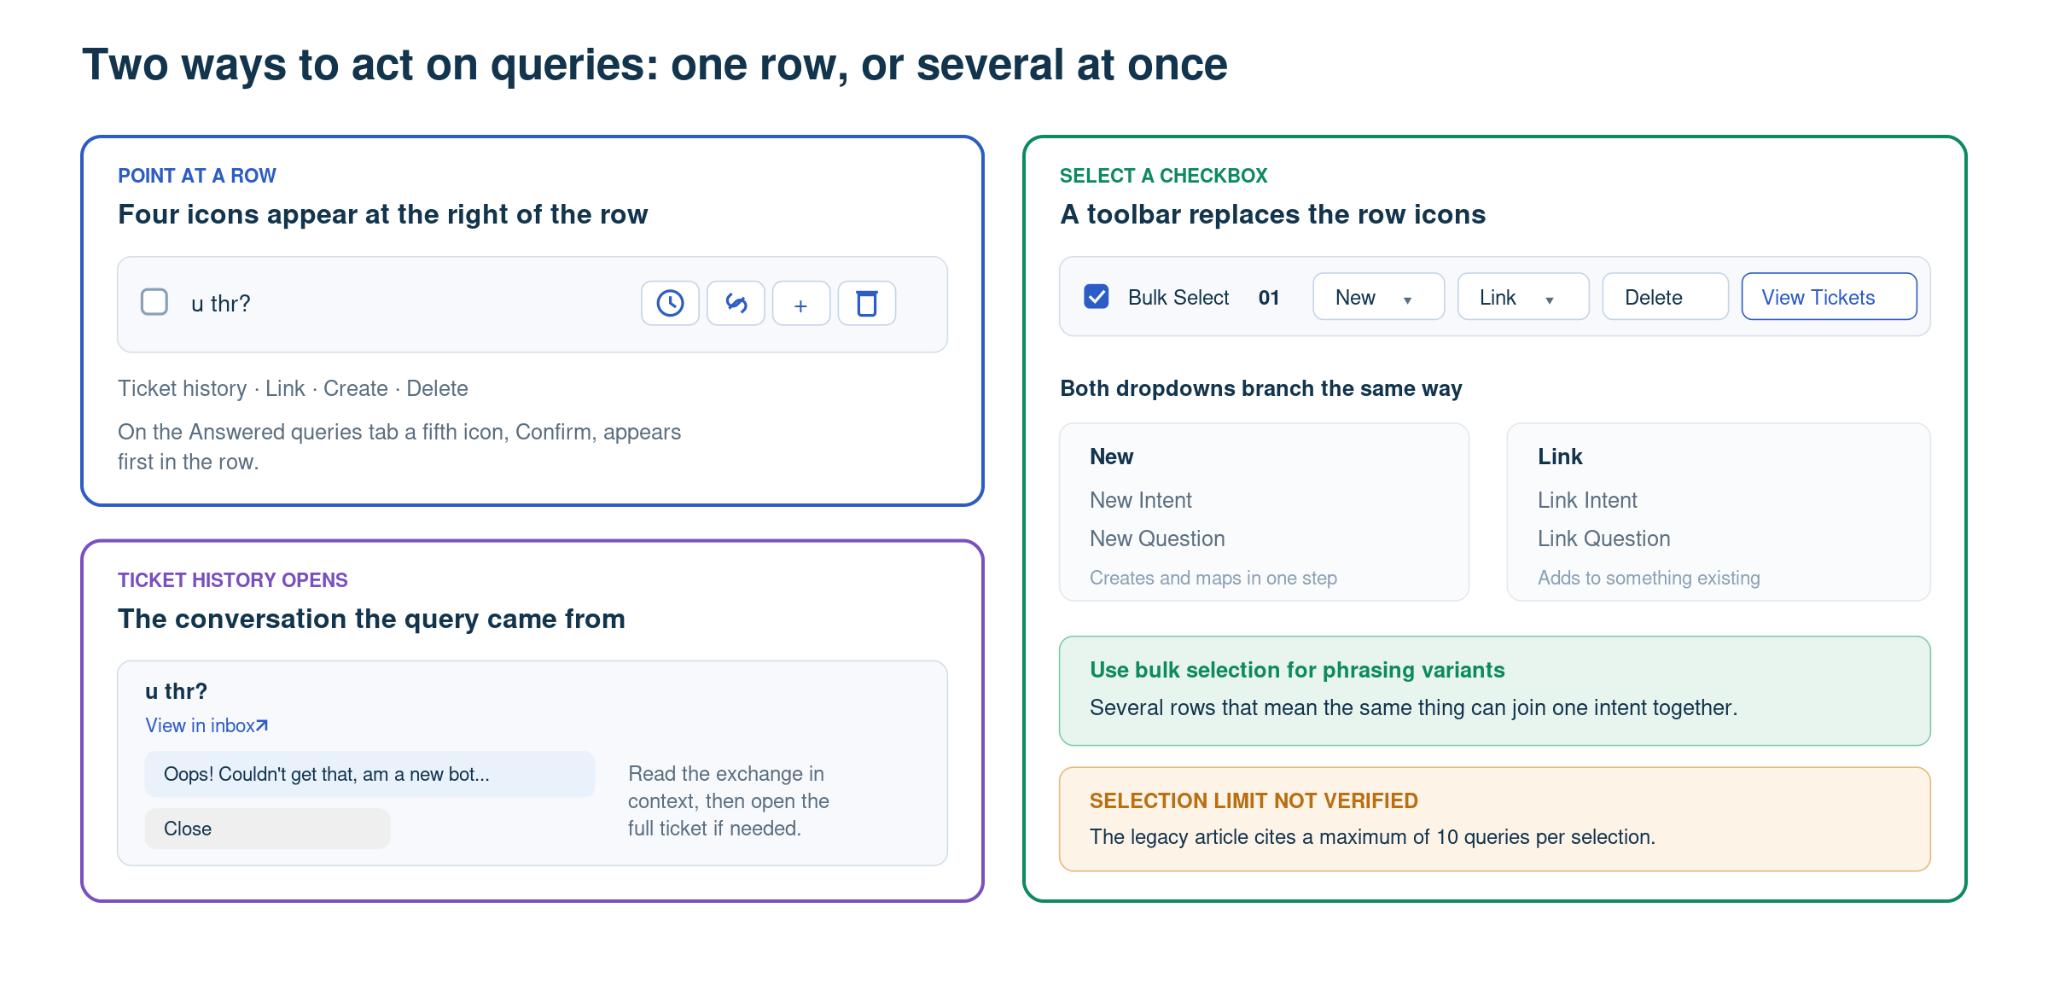
The bulk toolbar displays Bulk Select with a running count of the queries you have selected, followed by New, Link, Delete, and View Tickets. Both New and Link are dropdowns that branch into an intent option and a question option.
Review unanswered queries
Unanswered queries represent customer needs the chatbot does not yet recognize. Mapping these queries as utterances expands the range of messages an existing intent or question can match.
To act on an unanswered query:
- Open the retrain page and select the Unanswered queries tab.
- Point at a query in the list to reveal the row icons.
- Select the icon for the action you want.
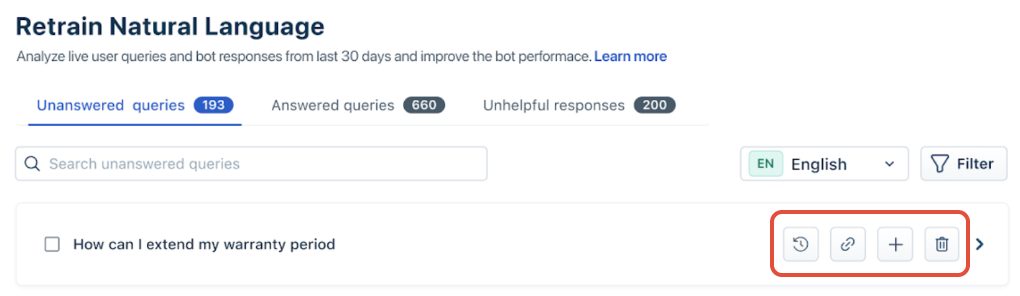
The following actions are available on each row:
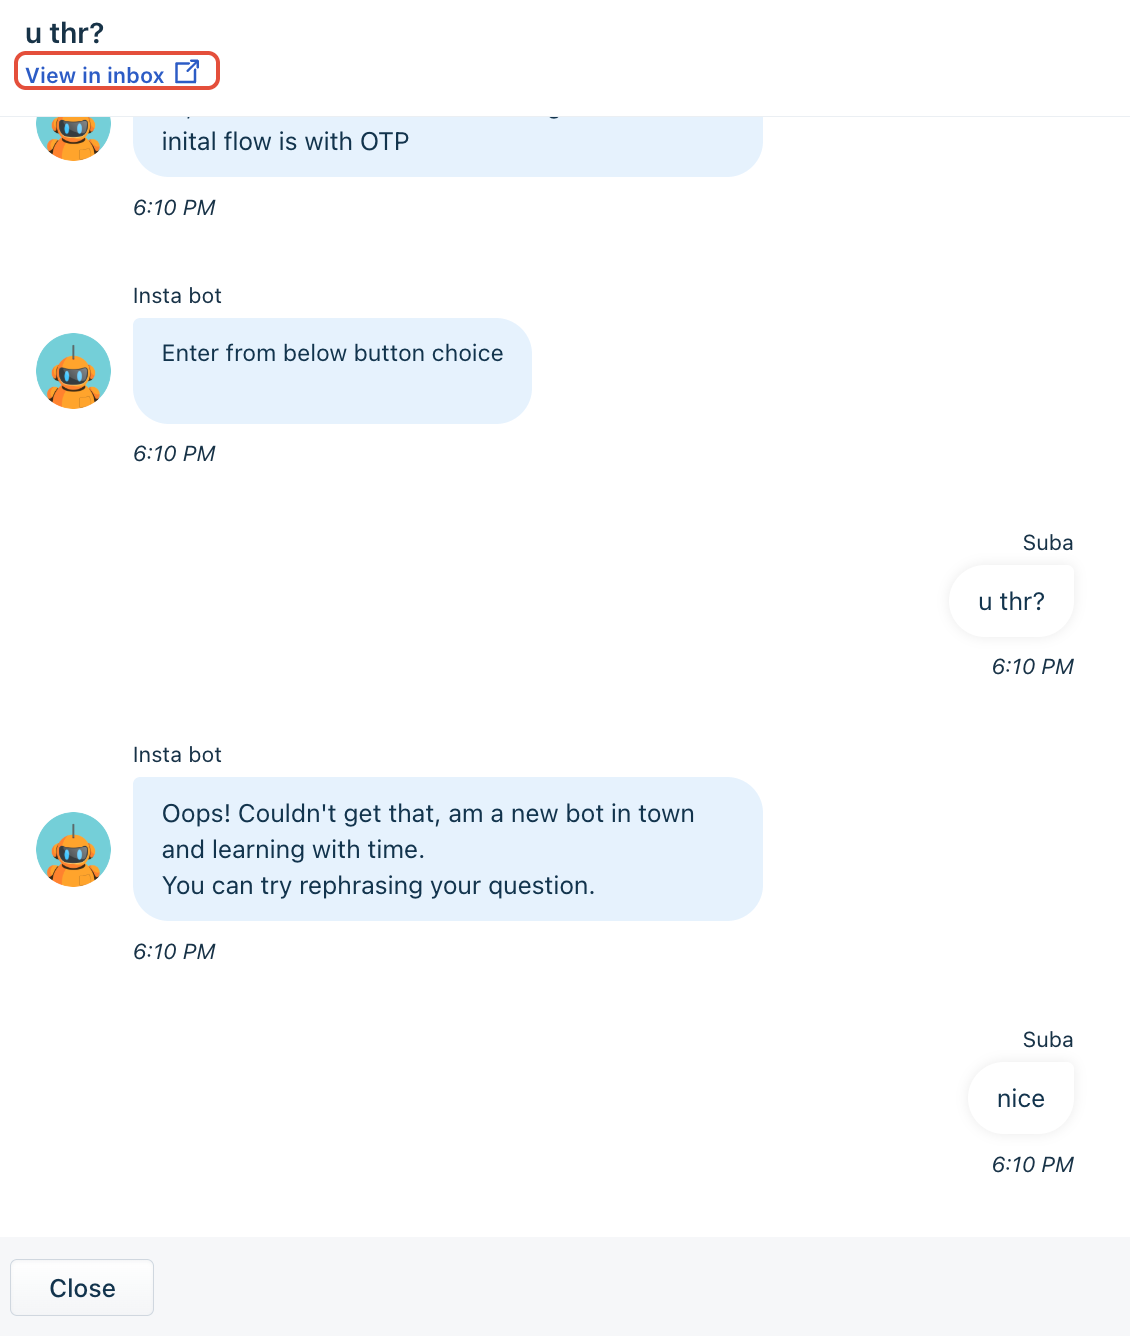
- Ticket history — Opens the conversation the query came from.
- Link — Adds the customer message as an utterance to an existing intent or question.
- Create — Creates a new intent or question and maps the customer message to it.
- Delete — Removes the customer message from the list.
Tip: Use Link when an intent already covers the customer need and only the phrasing is missing. Use Create when the need itself is not yet represented in the chatbot.
Read the source conversation
Reviewing a query in isolation can be misleading, because a short message only makes sense in context.
Ticket history opens a panel showing the full exchange, including the chatbot's reply. Select View in inbox to open the complete ticket, where you can see its tags, status, priority, and assigned agent.
Search and filter queries
Search and filters narrow a long list to the queries worth acting on.
- Enter a term in the search bar to find specific queries.
- Select the language dropdown to switch the list to another language. The dropdown lists the languages available for the chatbot.
- Click Filter to open the filter panel, then set Date and click Apply.
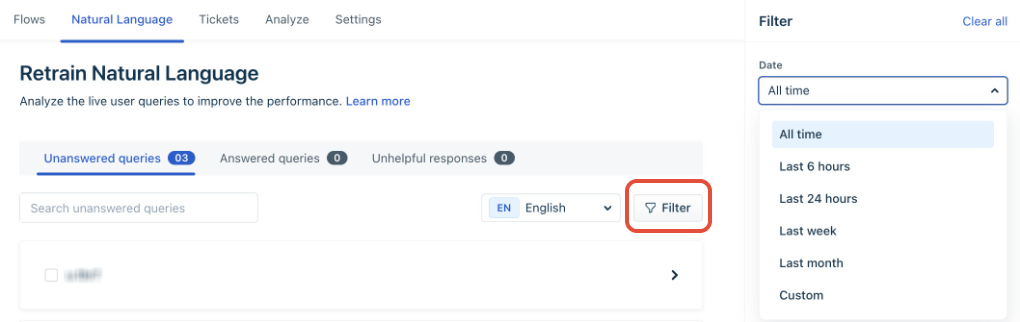
The Date filter offers All time, Last 6 hours, Last 24 hours, Last week, Last month, and Custom. Click Clear all in the filter panel to remove the filters you have applied.
Select queries in bulk
Bulk selection applies one action to several related queries at once, which is useful when customers phrase the same need many different ways.
To act on several queries at once:
- Select the checkbox on each query you want to include.
- Select New or Link in the toolbar, then choose the intent option or the question option.
- Alternatively, click Delete to remove the selected queries, or View Tickets to open their conversations.
Review answered queries
Answered queries show what the chatbot matched and what it replied. Reviewing this tab verifies accuracy because a query that received an answer can still have reached the wrong intent.
Each row displays the matched intent or question above the customer's query, so you can compare the two without opening the conversation. Rows that customers reacted to also display a feedback count.
To act on an answered query:
- Open the retrain page and select the Answered queries tab.
- Point at a query in the list to reveal the row icons.
- Select the icon for the action you want.
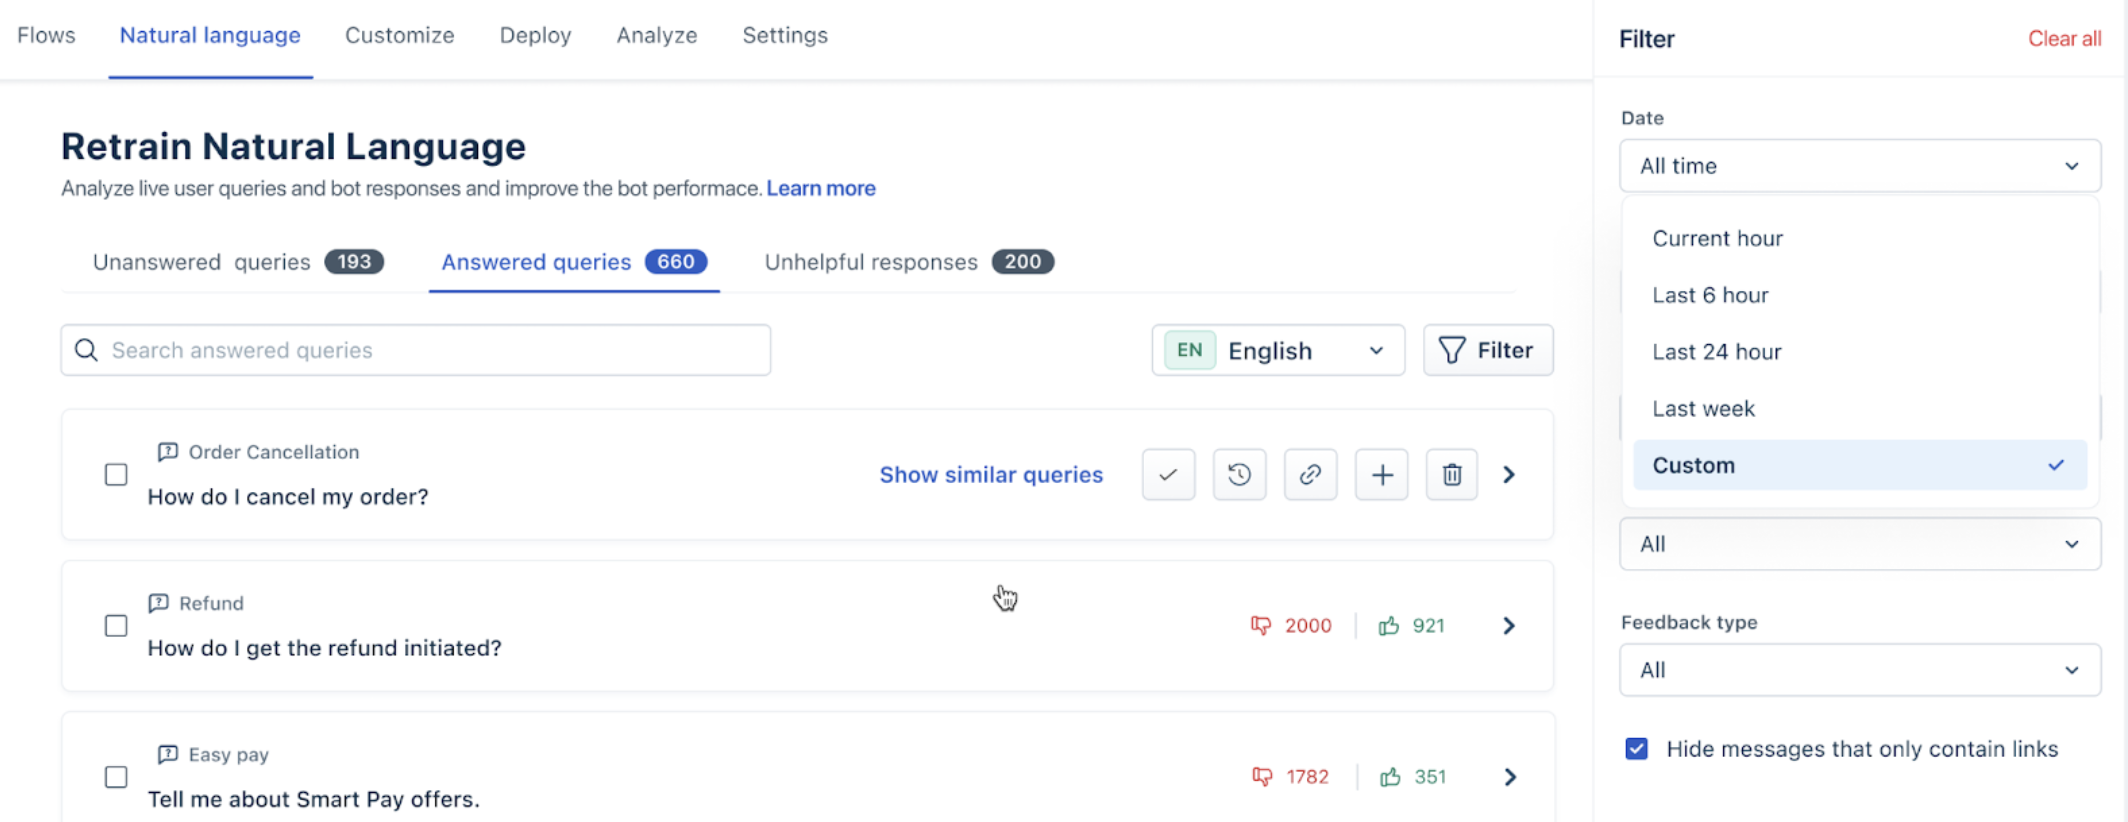
The Answered queries tab offers the same row actions as the unanswered tab, with one addition. Confirm appears first in the row and adds the customer message as an utterance to the intent, question, or FAQ that the chatbot matched. Use Confirm when the match is correct, and Link or Create when the query belongs elsewhere.
Improve unhelpful responses
Unhelpful responses identify intents and questions that the chatbot matched correctly but answered badly. The problem is with the configured response rather than the detection, so the fix is to revise the intent rather than add utterances.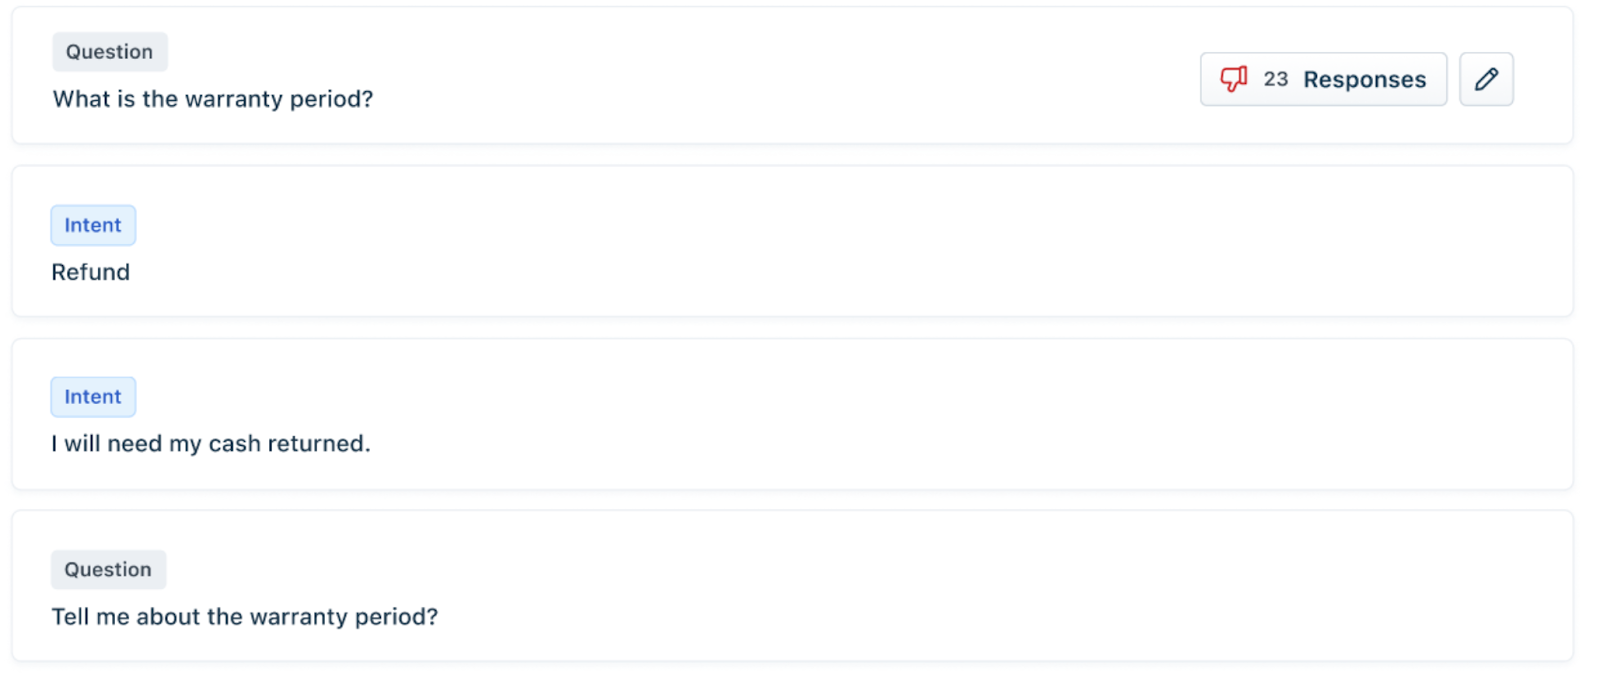
According to the legacy documentation, you open the Edit Intent screen from the pencil icon on the row, and a thumbs-down icon indicates how many times customers have marked that question or intent as unhelpful. Selecting the icon opens the reference conversations.
Tip: Treat a high unhelpful count as a priority signal. A response marked unhelpful many times affects more customers than one flagged once.
Create and manage Q&As
A Q&A pairs a customer question with a direct answer. The chatbot searches Q&As alongside intents, flows, and FAQs, and responds using the Q&A when a match occurs.
To create a Q&A:
- Go to AI Agent Studio > Chatbots and select the required chatbot.
- Go to the Natural Language tab and select Train.
- Select Q&A.
- Select New Q&A.
- Enter the customer question in the Question field.
- Enter the response in the Answer field. Use the formatting, link, and emoji controls as needed.
- (Optional) Select a flow under Map a Flow if the query requires a guided interaction sequence.
- (Optional) Enter one or more Tags.
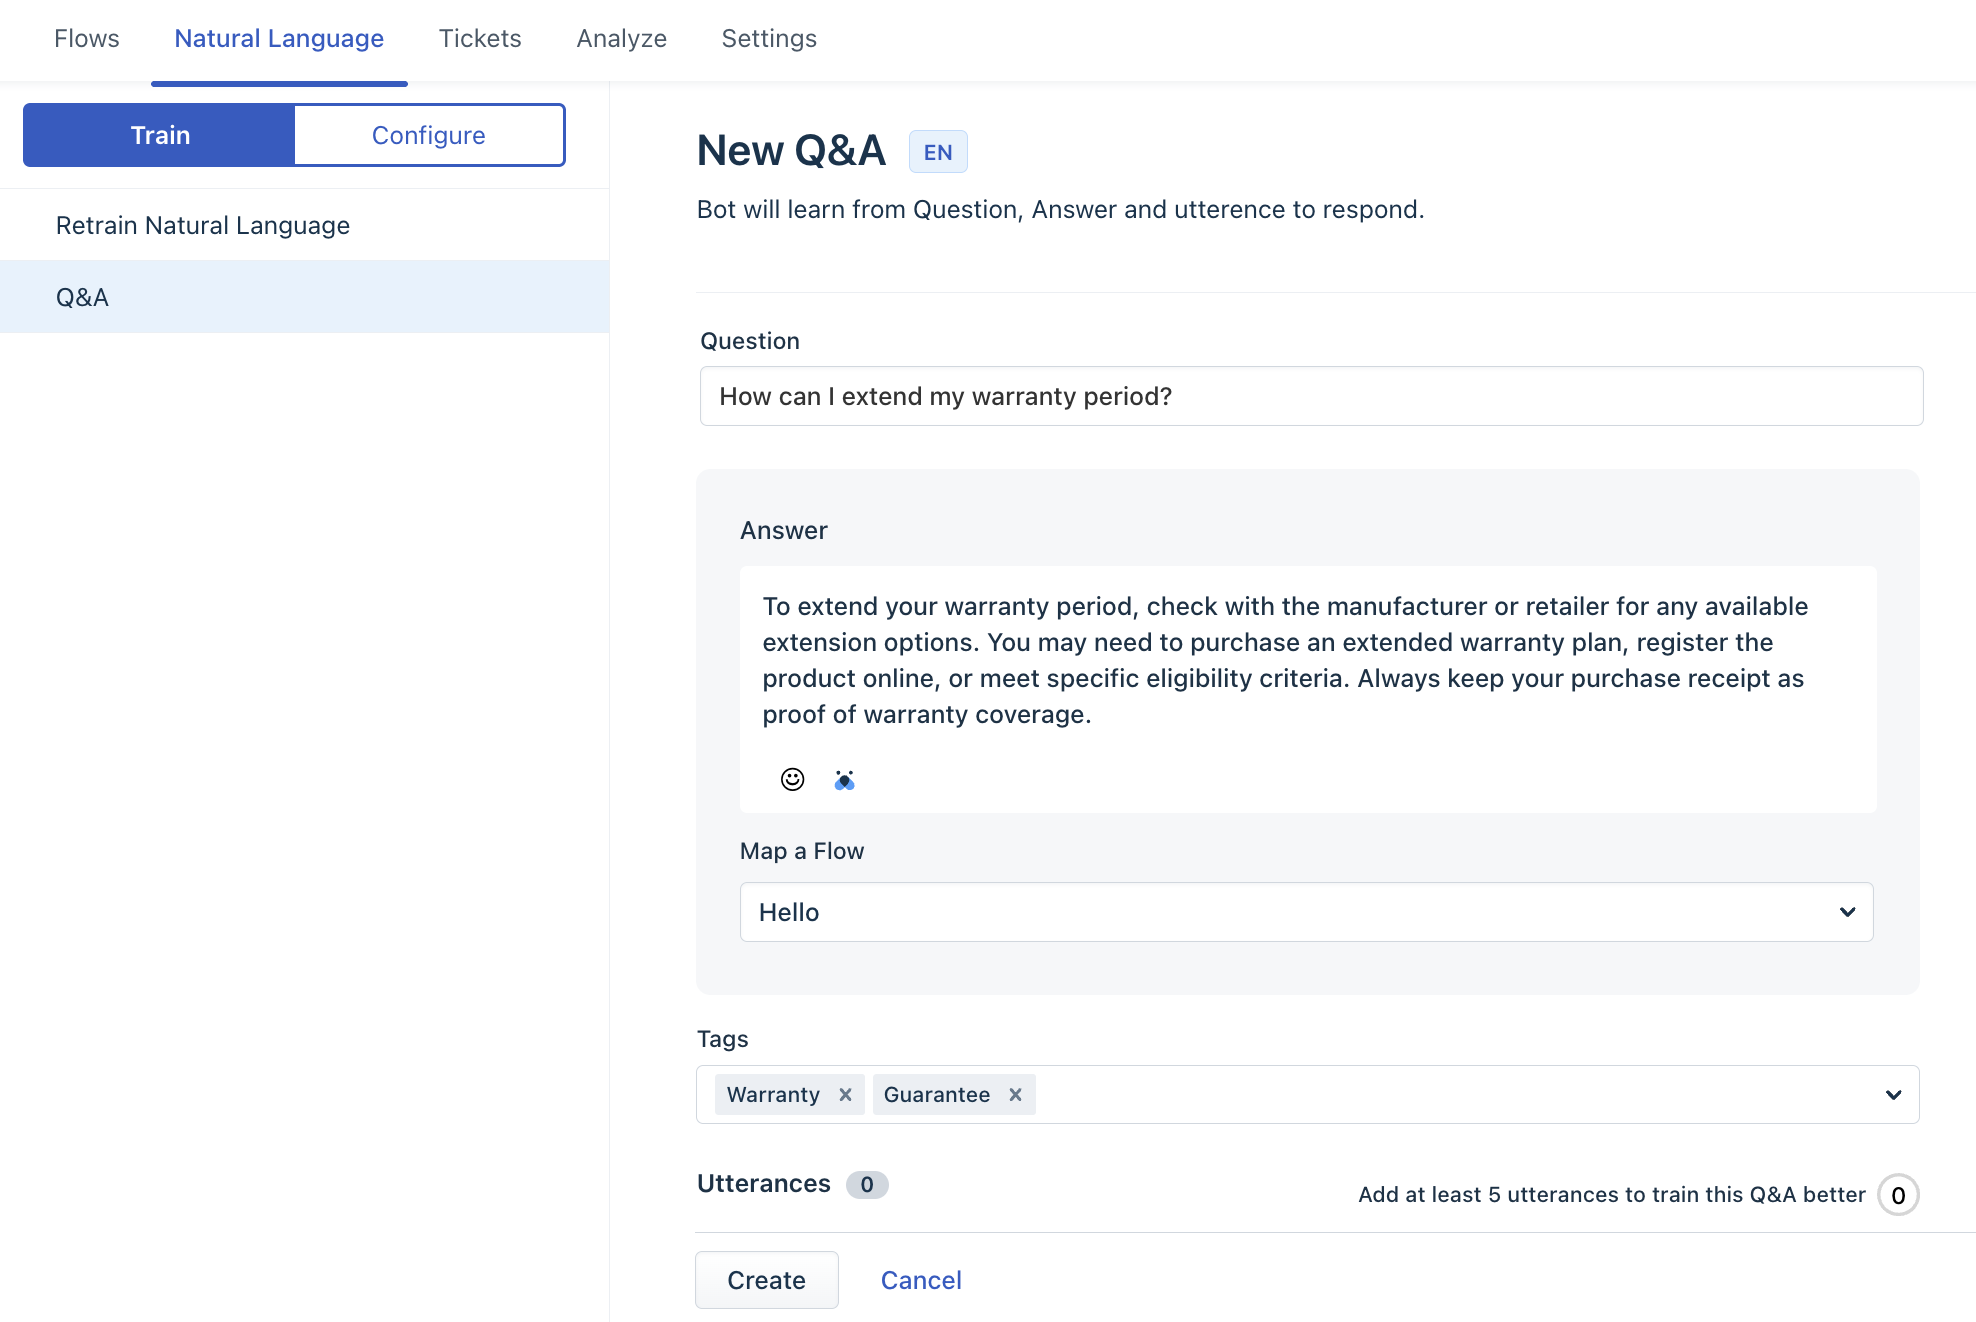
- Select Add Utterance and enter alternative customer phrasings. Repeat for each variant.
- Select Create.
Ensure you are working on the latest version of the chatbot before adding or editing a Q&A.
Add utterances to improve matching
Utterances are alternative phrasings that help train the chatbot. The Utterances counter displays the number of added phrasings; adding at least five is recommended for optimal training.
Add utterances that vary in phrasing while maintaining the same intent. To remove an utterance, select the delete icon next to the corresponding row.
Tag a Q&A for filtered results
Tags determine which Q&As the chatbot evaluates when Filtered Search is enabled. Tag values are matched against user properties, ticket properties, and chatbot variables.
Configure a Q&A in multiple languages
Each Q&A contains localized content per language. The language designated as Primary serves as the chatbot default.
- Open the required Q&A.
- Under Add languages, search for and select the target language.
- Select the language tab and enter the translated question, answer, and utterances.
Train the chatbot to apply your changes
Mapping utterances and revising intents does not change chatbot behavior on its own. The chatbot applies your changes only after training.
The chatbot header provides Train, along with Publish on a draft version and Deploy on a published version.
Unlock new AI-powered possibilities
We encourage you to explore the latest version of Freddy AI Agents to unlock new AI-powered capabilities. While natural language settings remain available for your chatbots, we recommend looking into Freddy AI Agents to see how they can further enhance your customer support experience.